Indoor Plumbing with a Twist

by Kent Griswold on December 2nd, 2011. 16 Comments

By Margy Lutz

Several years ago I wrote posts about living off the grid in our float cabin on Powell Lake in Coastal BC. You can read them here on the Tiny House Blog at “Our Little Cabin Up the Lake” and “Living on the Water.” Our float cabin, at the time, was 420 square feet downstairs with a 200 square foot sleeping loft under the peak of the roof. That is more than ample living space, but what it didn’t have was “indoor plumbing.” This fall we decided to trade in our trusty outhouse for a 60 square foot (6X10) bathroom with a composting toilet. The view won’t be as great, but the convenience will be appreciated. And instead of climbing four flights of stairs, we just have to go into another room. No rain, no wind – how civilized.

Our good friend John, who built our cabin, took a design I created and made it a reality. The bathroom addition is downstairs off our guest bedroom. He framed the walls, tied the roof into our existing one, made the old window into a doorway, added a window to the bedroom, and even gave us a side porch extension. He is a jack of all trades and was able to handle most of the work single handedly. Wayne and I worked on finishing touches like painting and furnishing.

We chose a Sunmar Excel NE for our composting toilet. The NE stands for non-electric. While it isn’t hooked up to our cabin’s solar powered electrical system, it does have its own panel to run a small fan within the air circulation pipe. That helps eliminate odour, and keeps the air moving around the compost as it processes. Six twists of the built in handle after each use keeps the contents in the holding drum mixed and working. The air circulation pipe rises above the roof line and has a built-in rain deflector. There’s also an overflow tube just to make sure there are no accidents indoors. With just two of us using the toilet, the capacity is excellent. We’ve had in operation for two months now, and are very pleased.

Our bathtub has been in our downstairs storage room for several years. Now it’s part of a real bathroom. The tub, however, isn’t connected for hot or cold water. Our bathtub is a cold weather luxury. In the summer, our natural swimming pool is all we need for a cooling swim or wash. We’ll continue to heat our water on the wood stove. I can fit four large pots on the surface at the same time, and a hot winter fire will get them almost boiling. Add an equal amount of cold water, and you have enough for a nice soak or soaping down. And there’s nothing like bathing with a friend to save water.

The bathroom also gives us some additional space for storage. A shelf built by John holds towels and toilet supplies, a recycled $1 end table holds toiletries, and a commercial pantry kit on sale for $49 provides space to store my canning in a cool place away from the sunlight. What a difference a little extra space makes when it is used wisely.

You can find more information about float cabin and off the grid living at http://PowellRiverBooks.blogspot.com. For information about Wayne’s Coastal BC Stories, come to www.PowellRiverBooks.com. Up the Lake and Farther Up the Lake have lots of information about our cabin life on Powell Lake.

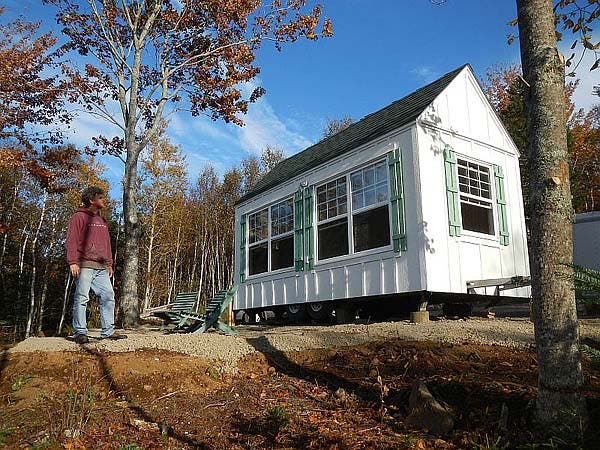
John frames the 6 X1 0 bathroom addition and new side porch. Continue Reading »

Posted December 2nd, 2011 by Kent Griswold and filed in Floating Homes, Small House Feature
Tags: , , , ,
16 Comments

How to Make a Composting Toilet

by Kent Griswold on August 19th, 2011. 67 Comments

As my husband and I began mapping out the interior of our rustic shed-turned-cabin in Montana, he knew we wouldn’t have plumbing, and I knew I didn’t want to deal with chemicals or smells. With two small children and weather that can range from -20 to 85-degrees Fahrenheit, we also didn’t want to deal with schlepping outside for potty breaks. Building our own humanure toilet turned out to be our perfect solution.

With only 12x20 feet of living space, the whole cabin is virtually a kitchen/bedroom/bathroom. We had to choose between putting the loo by the hot stove (not safe for children) by the hide-a-bed, or in this quiet corner. While some question the cleanliness of pooping so close to a food prep area, one must remember that this is not a flushing toilet that sprays bacteria into the air with every flush. Your backside seals the toilet while you do your business. There is no splash. Compost debris quickly covers the deposits, and the lid is shut immediately. Also, having water within easy reach is a must for cleaning up "accidents." We hope to adjoin the outhouse to The Shabin in the near future.

We get quite a few jokes from friends and family about our “lovey loo,” but I would take our lovely-loo over a honey bucket any day! It’s a bucket inside a wood box, and we cover – um – the deposits with sawdust. it has a real toilet seat on it for looks and comfort, but it is what it is, and it works very well.

Recycled red outhouse behind The Shabin always stinks!

Continue Reading »

Posted August 19th, 2011 by Kent Griswold and filed in Tiny Furnishings
Tags: , , , ,
67 Comments

Bill Brooks Tiny Solar House Part 3

by Kent Griswold on February 9th, 2011. 15 Comments

Tiny Solar House part 3 by Bill Brooks. This video covers his storage area and refrigerator as well as some of the electronics in the unit to convert the electricity to the different modes available.

Also a tour of the shower and bathroom area and an introduction to Bill’s composting toilet. Again lots of little details that you may not have thought of. I appreciate Bill being such a great tour guide of his work.

View Part 1 and Part 2 here and join the Youtube Tiny House Blog Channel here.

Posted February 9th, 2011 by Kent Griswold and filed in Stick Built, Tiny House Video
Tags: , , ,
15 Comments

Collapsable Living Quarters

by Kent Griswold on December 1st, 2010. 7 Comments

Derek (Deek) Diedricksen from relaxshax and the Tiny Yellow House videos has sent me a couple of new videos and I want to share them with you. Here is what Deek says:

This is a lil’ offbeat- but heck, I’ll send it your way anyway, as its designed for small space living- and when unfolded, only takes up 8 square feet as well….later providing deck/work space, and shelving space when the kids (or adults) outgrow it…the idea is a small scale rendering, or sorts, of an adult-sized structure, outdoors, that I’d like to build off the side of a house, or freestanding wall in the woods, someday- just to try it out. Collapsable living quarters.

As promised/for laughs- whether or not you have use for it….and sorry to inundate you with videos, as I know I just sent you that fold-down, tiny space-using fort video (which is almost going semi-viral already- bizarre). Lump ‘em together if you have to/want to.

Posted December 1st, 2010 by Kent Griswold and filed in Tiny House Video
Tags: , , ,
7 Comments

Composting Toilet

by Kent Griswold on November 4th, 2010. 38 Comments

Following is a guest post by Walt Barrett.

I promised that I would write an article about the composting toilets that we build, so here it is. It includes my idea of a sliding adjustable urine separator.

The customers that we have using this toilet are very happy with it.

One of the main killers in the world is contaminated drinking water. In third world counties people can be very careless about where they dispose of their fecal matter. The sad results are disease followed by death usually from Cholera! This is because the runoff from this human waste is polluting the streams, rivers and lakes in those countries. We don’t need fancy units to solve this problem. All we need is to convince people to properly dispose of their own waste in a composter protected from the rain to prevent runoff. You would think that at least in the last 5000 years the could have learned that.

Well this is our version of the composting toilet for the off grid home so that you can have the indoor convenience and a safe, economical disposal method for human waste.

Please read this and don’t skip any steps or you will ruin the project.

It’s tricky in a couple of spots to get the unit in square.

This is a relatively simple unit to build and I am just going to take you through all the steps right now. My son John and I sketched out the design we had been discussing for a practical composting toilet, and figured out the dimensions that we needed to fit the actual standard toilet seat and make room below for the two plastic collection bins and the vent stack. We also wanted to build as many units as possible from a single sheet of decent quality 3/4 inch plywood. While at the Home depot we had a 4′ x 8′ sheet of plywood ripped into three long pieces approximately 16” wide each. Those cuts must be exact so all three lengths have the same width. Home Depot or Lowe’s will use a panel cutting saw which will make perfect cuts if the sheet is measured correctly. Note that due to the width of the saw blade the width will be slightly under 16”. You can compensate for this on assembly by assembling the pieces so that the box is slightly narrower than 16”

Next we cut two 16” wide X 16 inches high for the two (2) end pieces.

That leaves the two sides, the bottom, and the top. Now this is where you have to be careful. Look carefully at the construction of the box in the photos. We cut the two side pieces 22 inches x 16 inches high. That left the top and the bottom pieces which we cut 23 ½ ” inches long. Now we have all the pieces and that leaves us to position the store bought toilet seat and trace the hole in the top cover. I use the larger and better oval type toilet seat that fits the better quality toilets that you find in better homes and all commercial applications. They are much more comfortable for adults. I then drill a 3/8” hole for the saber saw, and cut out the hole in the top of the box. Make sure the hole is back far enough to accommodate the urine collector drain bin.

Now let’s stop right here for a minute and make a cutting schedule.

All pieces are ripped 16 inches wide. It allows you to get the most toilets from one sheet of ¾ inch plywood. So here is the schedule. ” = inches.

2 End Pieces 16” x 16”
2 Side pieces 22” x 16”
1 Bottom piece 23 ½” x 16”
1 Top piece 23 ½” x 16”

At this point it is best to sand, and clean all the pieces off with paint thinner. Because if you are going to stain your unit like we do here. You must stain before you start using the wood glue. If you don’t stain first, wherever you get glue on the wood the stain will not take and it looks terrible.

After the stain is thoroughly dry I use a couple of brads on each end and lightly tack the four sides together while just sitting on the bottom piece just to check for fit, and using a large metal square I make sure it will square up in three directions. You could also measure diagonally from corner to corner for equal dimensions in two directions. Then set the top on Just to make sure it fits squarely.

Once you are satisfied with all of the workmanship and the fit of all the pieces, it’s time for the permanent assembly. This is how we do it.

  1. Set the four sides that are lightly tacked together on your flat work bench surface.
  2. Remove one of the ends that you have tacked on and tap the finish nails that were holding it back away so that you can hammer them in again easily.
  3. Then run a thin bead of quality carpenters glue down just off center favoring the interior of the box. Do not use too much glue as it will squash out all over your finish. Thats why you always favor the inside edge. You cannot stain over excess glue blotches.
  4. Now careful pet the end cap back in place and nail it securely with six long finish nails on either side.
  5. Repeat the process on the opposite end.
  6. Next you run a bead of glue around the rim where the bottom of the box will be nailed.
  7. Set the bottom on and while someone helps to hold the box square you nail on the bottom using long finish nails about every four inches. It is very helpful if you nail a couple of cletes to hold the corners square while you nail your box together. Corner cletes on either end will also hold your box square while the glue is drying. If you have clamps, use them too get a tighter glue joint. You can also take a length of rope and wrap it around the box , make a loose knot, insert a length of stick and twist the rope until you get several pounds of pressure on your joints.
  8. Be sure to wash off any glue that squeezes out of the joints immediately.

That leaves us with the top which never gets fastened down because it has to lift on and off to remove both of the bins for cleaning etc. the lid is kept from sliding around by use four pieces of aluminum angle tacked inner the rim on the center of each side to provide a snug fit to the box. That way the lid is easily removed for cleaning purposes. See the photos for the aluminum pieces.

Now you have built a regular composting toilet without a urine separator. We got our plastic collection bins from Walmart. We purchased a smaller fairly deep bin for the urine collector. We got the fittings and clear plastic ½ inside diameter inch drain hose, and clamps from the plumbing department at the home depot. The drain hole goes out the side of the bin and box as high up as you can get it without kinking the hose and still get a good gravity feed to your exterior collection system. The brackets are made from the flat perforated metal plated to buy at the home depot that are use for building decks and joining pierces together for various construction projects. I bent then to the shape I wanted using my bench vise and a rubber mallet. Be careful for sharp metal edges! If you want a vent stack you can put it in one of the rear top corners or elbow out of one of the rear sides, or end. It the best way to go and add a solar vent fan too.

This is a pretty good project for a beginner, but believe me, manufactured units go from $800.00 to $2,500.00 dollars, and thats a lot of money for a person on a budget. This unit will work just as well. Just keep a spray bottle around with a little bleach and water in it to freshen up the urine catcher after each use. You can cover the fecal matter after each use with any kind of dries vegetable matter, like saw dust, Pete moss. Dried leaves, dried grass etc. Just don’t get bleach water in the composting material.

You can empty the compost into a barrel with a watertight lid on it. If you are going to introduce earthworms to the compost you have to keep it moist without drowning the worms. Be sure to make provisions fore the composter to drain excess fluids into more compost beneath it. Never compost anything near your water supply. Keep the composter as far away from you well as possible. After a couple of years the compost will turn int rich black soil. Throw all of your table scraps into the outdoor composter too.

Well, I think I covered everything. If I didn’t, I’m counting on you all to let me know.

Walt

© 2010 Walt Barrett

Posted November 4th, 2010 by Kent Griswold and filed in Tiny House Articles
Tags: , ,
38 Comments

A Comment About Tiny Homes

by Kent Griswold on March 4th, 2010. 8 Comments

Walt Barrett sent me an article sharing his thoughts about tiny houses and I thought you would enjoy reading it so let me turn it over to Walt.

Lately, in the light of two very recent earthquake disasters, I have been giving a great deal of thought to the advantages of living in a small self contained, or autonomous home. The benefits are quite obvious, and huge. First of all, you will probably be located in a rural area far from the looting and other crimes commonly found in cities after a disastrous earthquake, or other natural disaster.

Photo Credit: Jay Shafer

There is also the advantage of not running out of power because you will be making your own. If you are using a composing toilet you do not have the problems associated with sewerage disposal. You most likely will have your own water supply which would be pumped from the ground by a solar powered water pump. Continue Reading »

Posted March 4th, 2010 by Kent Griswold and filed in Tiny House Articles
Tags: , , ,
8 Comments

ICS SIPs Trösta Outhouse

by Kent Griswold on February 14th, 2010. 9 Comments

Luke Danielson sent me this interesting concept for an outhouse that I thought would work for someone with a tiny house. Here is what Daniel has to say about his design:

I was skeptical at first but after reading Humanure (everyone should read this book!) I was inspired to design an outhouse that incorporates a composting toilet. I know there are many out there that have been doing this exact thing for years, but I’d like to think that with the use of SIPs, the Trösta (“comfort” in Swedish) could be one of the most efficient.

With R-28 closed-cell SIP walls, roof, and floor, the unit would require very little input to heat or cool. Plus, with temperature being crucial to the composting process, it just makes sense to have a highly insulated outhouse. I designed it with the use of 4×8, 4×9, and 4×10 sheets of OSB to keep scrap and price to a minimum. With is being a bit larger than typical outhouses, you could use that extra space as a storage shed, or even split it with a divider wall for two toilets for a Men’s and Women’s unit. Continue Reading »

Posted February 14th, 2010 by Kent Griswold and filed in SIPs, Tiny House Concept
Tags: , , ,
9 Comments