Build a Small Log Cabin #3
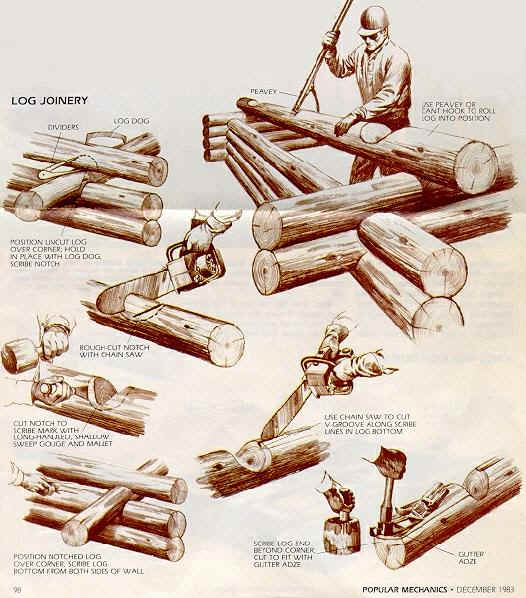
This is part 3 of a series on building a small log cabin. This is a reprint from a 1983 Popular Mechanics article by Michael Chotiner with illustrations done by Harry Schaare. Enjoy and I hope this helps in your quest for the ultimate tiny log cabin.
Many different types of notches can be used to join the logs, but a good choice for the beginning log builder is the technique shown here: the scribe, fit, round-notch method. It features semicircular notches cut in the bottom of the logs to fit over adjacent logs.

Also, a V-shaped groove is cut down the length of each log bottom so the entire length can sit flush on the log below.
Although this method is slower than others, the corner joints are self-draining-water running down the outside of the house hits the log tops and runs off, instead of being trapped in the notch. The V-grooves also eliminate air drafts between the logs. The joints between courses do not need chinkirtg, so you can avoid one of the most chronic maintenance problems of log homes: repairing cracked chinking.Cutting the corner notches is a fivestep procedure.
- 1. First, roll the log into position and sight along its length to make sure any crown is pointing to the outside of the wall. Try not to use logs that have more than a 1-in. crown per 16 feet of length. Then secure the log with a log dog as shown in the drawing.
- 2. Scribe the shape of the lower, log onto the uncut log using compass dividers with a pencil or marking crayon inserted in one leg. Rough-cut the notch with a chain saw, then finish it with a shallowsweep, long-handled gouge.
- 3. Reposition the log, allowing the notch to seat. Then scribe the full length of the underside of the log running the blank leg of the dividers along the top of the lower log. Scribe both sides of the log to yield the two lines which define the V-groove.
- 4. Cut the V-groove with a chain saw to a depth of 1/2 to 3/4 in. Remove the waste, then roll the log back into position and rescribe the corner notch as well as the log end extending past the notch. (By cutting the V groove, there is now some space between the scribed log and the one below.) Cut the notch to the new scribe line and cut the tail end of the log using a gutter adze. This tool yields a concave groove that is tighter and more attractive at the exposed log ends.
- 5. Reposition the log, then pick up one end and drop it into place. This is called “thumping” and it will leave compression marks on the parts of the log that still need trimming. Make any necessary adjustments, then pack fiberglass insulation into the groove and roll the log into place. The fiberglass will act as a sort of “internal chinking.”
With the notching complete, bore a 2-in. dia. hole about 8 in. in from each corner and insert an alignment peg. The peg should be loose fitting, recessed about 1-1/2 in. below the top of the hole, and extend about halfway into the log below. Install these pegs every 8 ft. in the length of a log and within 1 ft. of each window and door opening.

In part 4 we will continue the completion of the walls, roof and cabin.
To read Part 4 – Click Here
If you enjoyed this post, subscribe to our feed
Build a Small Log Cabin #2
This is part 2 of a series on building a small log cabin. This is a reprint from a 1983 Popular Mechanics article by Michael Chotiner with illustrations done by Harry Schaare. Enjoy and I hope this helps in your quest for the ultimate tiny log cabin.
Many pioneer cabins were built without foundations because they were constructed in haste or meant to be temporary shelter. But a proper foundation is definitely required. Stone foundations traditional, but block and concrete walls are as good, or better, and they require less work.

If you don’t want a full basement, you must excavate at least below the frost line, install footings and construct a wall up to 20 in. above grade level. You must also install piers within the foundation walls to support the floor girder. Also, install anchor bolts along the top of the walls to attach the sill. Begin floor construction by hewing or cutting flat the bottom of the sill logs. Then bore holes in the sill logs to accommodate the anchor bolts and install sill sealer or a termite shield according to the local building code. The corner joints are made by bottom notching the logs as shown on page 98. Next, hew flat the top of the girder and install it over the support piers. Join it to the sill with a mortise and tenon joint. Drive 60d nails through the top of the tenon and into the mortise to complete the joint.
In a similar manner, hew or cut flat the top of the joists and install them between the girder and sill logs so they are flush with the top of the girder. Install the subflooring perpendicular to the direction of the joists. Now you’re ready to start on the walls.
To read Part 3 – Click Here
If you enjoyed this post, subscribe to our feed
Build a Small Log Cabin #1
There has been so much interest in tiny and small log cabins that I have found a second article that really fits this area. This is a reprint from a 1983 Popular Mechanics article by Michael Chotiner with illustrations done by Harry Schaare. Enjoy and I hope this helps in your quest for the ultimate tiny log cabin.
BUILD A Handsome, sturdy and affordable Log Cabin. The log cabin is still a great choice if you want to build your own home.

Mankind’s preference for living in structures made of natural timbers is longstanding and well documented. One story from the rich folklore of log building tells how a Grand Master of the Teutonic Knights insisted, around the year 1500, that a wood structure be built onto his stonecastle to provide a homier place to live. Many log structures built in the same period still stand in Scandinavia, Central Europe and the Balkans.Each area developed its own distinct methods, from the square hewn log homes of France to the dovetail-joined cabins of Germany. But when all these influences were transplanted to the New World, the Scandinavian style of round logs with bottom-cut corner notches prevailed. Examples of this method can be. seen.across the United States.Log building has always required a lot of patient, physically demanding work. And for the modem builder, it also requires learning some new skills.Here’s a short course in log building to show you what’s involved.
Opinions about log selection and proper cutting season vary with the individual craftsman and the building locale. In general, just about any type of log can be used, as long as it’s relatively straight, is around 8 to 10 in. in diameter and has only minor tapering-no more than 2 in., in a 16-ft.-Iong log. Conifers such as pine, fir, spruce and tamarack are preferred because these softwoods are workable, durable and relatively lightweight. Hardwoods, particularly oak can also be used, though their sapwood is highly susceptible to infestation by borers and fungus.Trees should be felled in early winter. The cooler temperatures make for slower drying time, which reduces log checking, cracking and splitting. It’s also easier to haul logs out of the forest over frozen terrain.The best seasoning method is to air-dry the logs for one to two years-the longer the better. Logs should be stacked off the ground with stickers-smaller diameter logs-placed between the courses. This allows for maximum airflow around the logs and promotes more even drying. You should also partially peel off the bark using a draw knife before the logs are stacked. This will increase their drying rate and cause only minimal cracking and splitting. However, before building begins, you must remove the remaining bark completely. It is a natural habitat for many different kinds of pests.In part 2 we will discuss the foundation needed for your cabin.
Financing Your Straw Bale Project
If you are interested in straw bale construction you will want to know how to finance it. Andrew Morrison of StrawBale.com has written the following article that covers this topic. Enjoy!
Financing Your Straw Bale Project
One of the most difficult aspects of building with straw bales may be finding money to finance the project. Conventional lending institutions do not like to take big risks when lending their money. Something that is outside of their comfort zone is very quickly turned away. This has plagued straw bale builders and our clients for years. In order to be successful at acquiring funding from conventional sources, it is important to understand the common reasons banks site when turning down loan applications for straw bale construction.
Can’t Find Comparable Sales
Because there are not an excess of straw bale homes in most communities, banks can easily say ‘sorry’ simply because of this one issue. It is important to push the banker and/or the appraiser a bit further on this point. Comparable sales are exactly that, comparable. Bankers will tell you that straw bale homes are too unconventional. Great! Now you have found access to your appraisal homes. Anything that is considered unconventional is now a comparable sale that can be used for your appraisal. In most markets, this will include log homes, rammed earth, cob, structural insulated panels (SIP), other straw bales, adobe, insulated concrete form (ICF), and anything other than a simple stick framed building. Don’t let them get away with telling you there are no unconventional buildings in the area. The appraiser and banker only need three comparable homes. Do your own research to find them if need be.
Too Unconventional
This is the biggest shell game the banks have. They tell you one thing when they mean another. It is so easy for them to say something is too far outside of their comfort level. After all, how can you argue with that, it’s their comfort level, not yours? The truth is, you can argue with that and you can win. A banker once told me that when you hear this, what is really being said is that you do not have enough capital to back up the loan. The same banker said he would loan me a $1 million to build a home out of matches if I had $1 million in the bank to guarantee the loan. Of course, if you have the money to build with in the bank, you probably won’t be out looking for a loan; however, you may be able to find someone who does have the money. Friends, family, and private investors are everywhere. Find someone to guarantee the loan and you will get your financing. Perhaps a family member will gift you the signature for free. If not, you can offer a small interest rate to the private money or family money lender. They do not have to put the money in an escrow account, simply have it available if you default on your loan. Their risk is not that high and there are ways to minimize their risk even further.
Closing Dates Are Important
The date of closing on a loan for the purchase of land and the construction of a home is very important. This may not affect you as much as it does the next person who wants to finance straw bale construction. Let’s say you are buying a piece of land and intend to build a straw bale home. If you get a bank loan just for the land and close that loan before you build, you are not setting a precedent for the next comparable sale. If you buy the land, hold it in escrow, build your home, and then close escrow, you have created a comparable sale for the next person building with straw. The reasoning is that construction loans do not generate comparable sales. They are not considered sales, but rather straight financing for construction. If, however, you tie the construction to the purchase of a piece of property, you then create a sale of a straw bale home, even if you built it yourself for yourself. The more people who do this, the easier it will become to build with bales.
The Homes Are Uninsurable
Another great myth worthy of its own article! If a banker tells you that you won’t be able to insure the home and therefore they cannot give you a loan, you can confidently tell them that they are actual incorrect. Just like the banking industry, this is a snag for straw bale home builders and owners, but it is not a permanent snag. There are companies all over the United States that are willing to write home owner policies on straw bale structures. They can be hard to find, but they do exist, and they are reputable companies. In fact, there are companies in Arizona that actually discount premiums due to the high fire resistance of the structures! Do your research and you can successfully insure your home.
When All Else Fails
If you still struggle with financing and/or insurance after employing all of the ideas you can conjure, you still have one last hope. If you are building an infill straw bale structure, you can change the wording on your building plans to eliminate the words Straw Bale. Very often it is simply the words that get the bankers stuck and not the reality of the home. If your plans say “Post and Beam frame with cellulose insulation†you are telling the truth and lowering the red flag words “Straw Bale.†If you are building a load bearing structure, consider your walls to be a masonry unit. The new engineering shows that the structures are strong enough on their own to resist lateral and out of plane shear stresses with the proper construction. Therefore, your bales become the base for the masonry unit. The plaster, bales, and wire mesh constitute the masonry assembly. Work on your verbiage and this will minimize the red flags as well. Consider the difference between: “Load Bearing Straw Bale Wall†and “Approved Engineered Masonry Assembly.†Which one would you approve without question? This has been the technique employed for years. I would like to see people move away from it and be straight with the type of home they are building. Nonetheless, the immediate reality of your situation may dictate that you need to use this tactic. If so, fine. After your home is complete, the reality for the next person will be different as you will have created a conventionally funded comparable sale to help them along their way, as long as you time your closing properly!
——————————————————————————–
ABOUT THE AUTHORAndrew Morrison is the founder and owner of A. C. Morrison Construction, LLC, a company specializing in straw bale construction. Andrew has a passion for straw bale construction that is matched only by his desire to teach his knowledge to others. Andrew is the creator and builder of the Straw Bale Village, a community of 15 straw bale homes in the National Historic Landmark City of Jacksonville, Oregon. He is a skilled, licensed General Contractor (CCB License #161204) with experience in designing and building both conventional and straw bale homes. Andrew has owned A. C. Morrison Construction, LLC, since 1996. Andrew received a BA degree from Hampshire College in 1995 for Glacial Geology. He also has a degree in construction technology. Please visit his professional web site at: www.StrawBaleConstruction.net
Straw Bale and Timber Frame
Straw bale works extremely well with timber frame construction. It is a great infill for tiny houses and small cottages. Andrew Morrison of Jacksonville, Oregon with his company at StrawBale.com has designed the neatest little cottage using these two elements.
This peaceful little cottage is perfect for the do-it-yourselfer who is interested in learning about building with straw bales, or for anyone who is looking to have a cozy peaceful retreat space added to there homestead.

It has passive solar capabilities built right in, and of course incredibly insulative walls. The stamped concrete floor can collect solar energy during the cool winter days through the large south facing windows and radiate it into the space at night. The design also presents many round elements such as rounded walls and windows and an open beamed arched ceiling that look to capture the organic qualities inherent in straw bales. An electrical plan is included on the floor plan and it features a lighting element along the ridge beam that absolutely drips with warmth.
The Sunset Cottage is a small yet cozy 200 square foot structure elegantly designed. It is very spacious inside with a large window seat and areas that can accommodate built in features such as closets and beds. It has a beautifully curved open beam ceiling that gives the space a “open” feeling. It is relatively easy to build and is a great way for someone interested in building with straw bales to create a nice art studio, meditation space, or guest house.
If timber frame and straw bale is of interest to you do yourself a favor and look this one over. For more information on this cute little cottage go to: StrawBale.com

Interior Sunset Cottage

Interior Coach Bed

Sunset Cottage Ceiling


