This is part 3 of a series on building a small log cabin. This is a reprint from a 1983 Popular Mechanics article by Michael Chotiner with illustrations done by Harry Schaare. Enjoy and I hope this helps in your quest for the ultimate tiny log cabin.
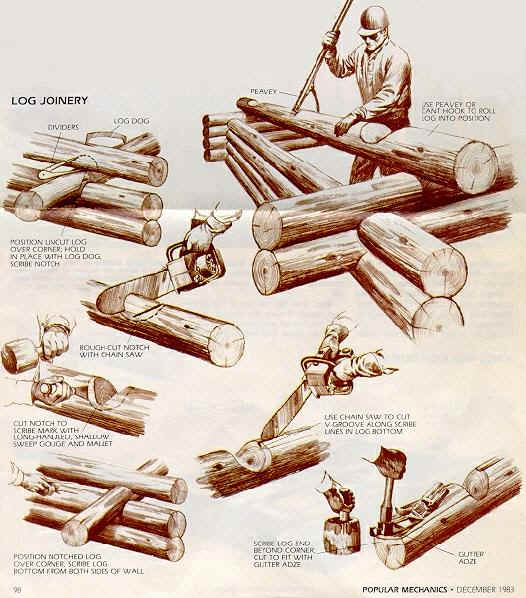
Many different types of notches can be used to join the logs, but a good choice for the beginning log builder is the technique shown here: the scribe, fit, round-notch method. It features semicircular notches cut in the bottom of the logs to fit over adjacent logs.

Also, a V-shaped groove is cut down the length of each log bottom so the entire length can sit flush on the log below.
Although this method is slower than others, the corner joints are self-draining-water running down the outside of the house hits the log tops and runs off, instead of being trapped in the notch. The V-grooves also eliminate air drafts between the logs. The joints between courses do not need chinkirtg, so you can avoid one of the most chronic maintenance problems of log homes: repairing cracked chinking.Cutting the corner notches is a fivestep procedure.
- 1. First, roll the log into position and sight along its length to make sure any crown is pointing to the outside of the wall. Try not to use logs that have more than a 1-in. crown per 16 feet of length. Then secure the log with a log dog as shown in the drawing.
- 2. Scribe the shape of the lower, log onto the uncut log using compass dividers with a pencil or marking crayon inserted in one leg. Rough-cut the notch with a chain saw, then finish it with a shallowsweep, long-handled gouge.
- 3. Reposition the log, allowing the notch to seat. Then scribe the full length of the underside of the log running the blank leg of the dividers along the top of the lower log. Scribe both sides of the log to yield the two lines which define the V-groove.
- 4. Cut the V-groove with a chain saw to a depth of 1/2 to 3/4 in. Remove the waste, then roll the log back into position and rescribe the corner notch as well as the log end extending past the notch. (By cutting the V groove, there is now some space between the scribed log and the one below.) Cut the notch to the new scribe line and cut the tail end of the log using a gutter adze. This tool yields a concave groove that is tighter and more attractive at the exposed log ends.
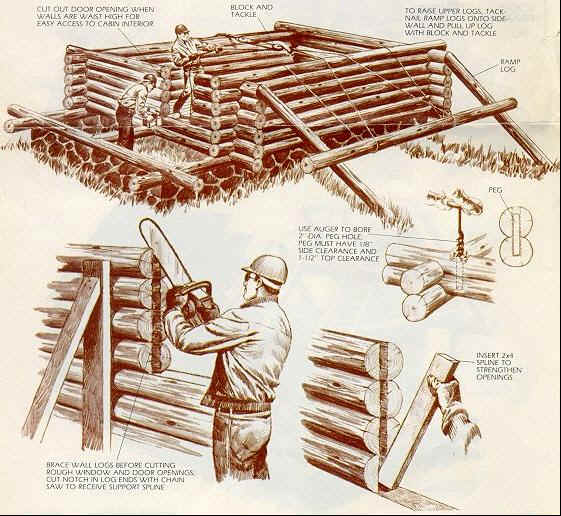
- 5. Reposition the log, then pick up one end and drop it into place. This is called “thumping” and it will leave compression marks on the parts of the log that still need trimming. Make any necessary adjustments, then pack fiberglass insulation into the groove and roll the log into place. The fiberglass will act as a sort of “internal chinking.”
With the notching complete, bore a 2-in. dia. hole about 8 in. in from each corner and insert an alignment peg. The peg should be loose fitting, recessed about 1-1/2 in. below the top of the hole, and extend about halfway into the log below. Install these pegs every 8 ft. in the length of a log and within 1 ft. of each window and door opening.
In part 4 we will continue the completion of the walls, roof and cabin.
Website source: http://www.schooloflogbuilding.com
To read Part 4 – Click Here
If you enjoyed this post, subscribe to our feed
I might as well just try building this one for our resthouse in Virginia. 🙂
an important factor for planning is estimating how much time and labor is involved in building with logs. To peel, set, notch and fit a 30′ log takes me (and a helper) a full day; to set and fit a 3 sided D log, I can do a whole course (120 lf). With the skinniny D style, a 12’log per hour. So for scribe fit, figure 30lf/day, so for a 12×16 560 lf = about 18 days from rough logs; a 12×16 or smaller could be done without help in that time frame.
That’s a good idea to make sure to get a groove of a few inches in each log. I am considering taking some of the trees on my property and then using them to build a cabin. If I do end up getting someone to clear the land, I’ll have to make sure to do that with the logs.
The article in Popular Mechanics from which this information is taken was done by Michael Chotiner in 1082-1983 at the Great Lakes School of Log Building in Isabella, MN. The logs were red pine taken from a 1939 CCC plantation on U.S. Forest Service land. I was the founder and teacher of that program from 1974 until my retirement in 2018. This article shows the essence of our log construction techniques but we changed lots of things (for the better) subsequently, as well as introducing new tools and safety equipment to the classes. Our website is still live at http://www.schooloflogbuilding.com for information on log-building instructional books and sources for specialty tools. Our methodology at the time was known as the “Canadian/Scandinavian full- scribed.”
Thanks for the update. I’ve added your link to the post.