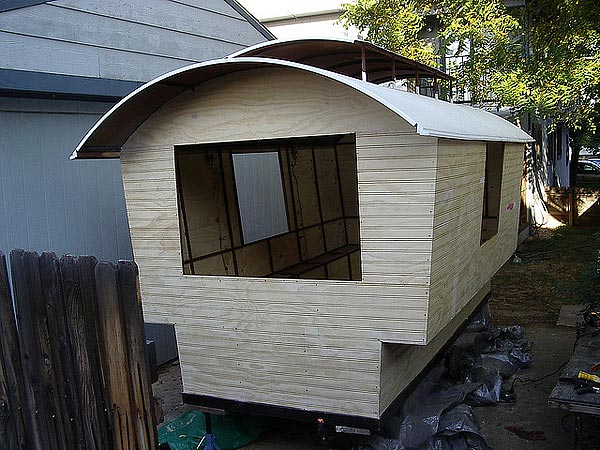
Darrel Schultz is building a light towable gypsy wagon. The floor is 12 feet long and 54 inches wide. The roof overhangs each end by about 16 inches.
It’s totally scratch-built from the fram up, as the pictures show. I used a Dexter torsion-bar axle with electric brakes. Darrel likes keeping things simple, so there will be no electrical system other than the trailer lighting. The lights on the inside are gas, exactly as were used on early airstream trailers.

Darrel will be using a wood-burning stove (a ” Lil Sweetie” boxwood stove from Vogelzang.) for heat. Darrel is building it to camp in, because his Teardrop that he built doesn’t hold three people. He won’t have the interior finished, but he hopes to have the exterior complete enough by late summer for a trip to Yellowstone.

Darrel and his son will just sleep on the floor and use the waggon as a fancy tent this year.
For readers that might be interested in building this style of shelter, Darrel derived most of the major dimensions from a set of plans for modelmakers by a gent named John Thompson. He is pretty sure he’s passed away, but his plans are available from a variety of sources.

He has plans for a reading wagon, a bowtop wagon, and ledge wagon, which is what his is. The most challenging thing for Darrel has been making windows, which are his design as well. Feel free to browse through the photos Flickr site. Darrel is always curious to see how others are tackling stuff. So please comment below if you have built something similar.


The only thing I’m concerned about is wind resistance while driving down the road with the roof overhang. I’ve considered building something along these lines, but was sure how to deal with the wind loads at freeway speeds.
Thanks Allan.
I plan on driving *really* slow. I doubt I’ll ever go much faster that 50 miles an hour. I kind of like that lower speed anyway. I learned to drive back in the mid-70s when the double-nickle was enforced. I miss those days.
I’m not so sure about that particular heating system. The vendor says “All mobile home stoves require an outside air intake for approval, this Vogelzang boxwood stove does not have that feature.” Carbon monoxide issue, etc.
(Be sure to put in a combo battery powered smoke alarm in any event.)
Also, I believe that that heat source is oversized (63KBTU) and another option would be better. I don’t think that can be safely installed in such a small space – too much heat. It’s not *that* “Lil”
Really like the design. I’m crazy about the Basque Wagons & etc. Good luck and I look forward to seeing more of the project!
Thanks for your thoughts Mike. To tell the truth, I’m not sure about that stove myself. I plan on enclosing it similar to how Jim Tolpin enclosed the stoves in both his ledge and in the bowtop known, I think, as the “Trillium.” (You can find quite a few construction pics of the Trillium if you look around.) If you look closely at the Trillium, he’s installed a fresh air intake duct directly under the stove. I’m planning on doing that as well. I’ll have a carbon monoxide detector to be safe. I plan on burning small pieces of wood, fast and hot, mostly to warm up the waggon on those really chilly mornings at colorado elevations above 9,000 or 10,000 feet, and maybe on some winter trips. We’ll see. If it’s too hot, maybe I’ll have more money and can spring for the stove I *really* wanted. the Sardine by Navigator Stove works. But that little sucker is over $700, just for black. I’d love with a capital L to have the red-enameled version, but…$$$
Regards,
Darrel
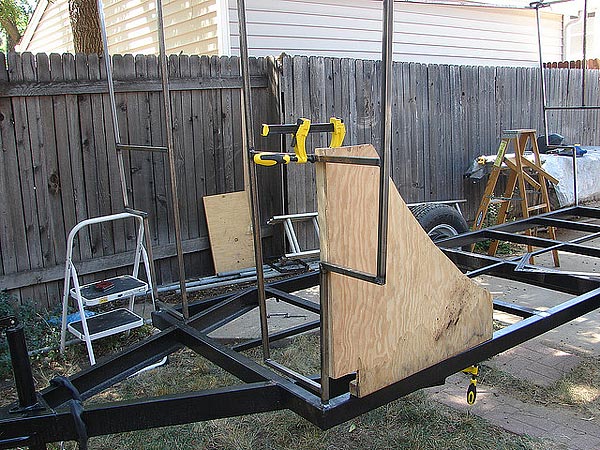
this looks great–love the steel(?) framing: gives it a certain quality of careful, skillful construction and somehow it looks slimmed down, too. I’d love some close-ups though, too. I can’t quite tell what the skin is made from/don’t recognize the material from a distance.
But I’m looking forward to updates that will show the interior–I want to see the way that popped-up roof section looks from the inside.
Hi Schneb, I replied, but I hit the wrong reply link. Check below for details about the paneling. Sorry.
Darrel
This is wonderful! I would love to get in contact with you as this is very much like we are about to build. We built a bowtop last year and decided to make the bigger hard sided one this year.
Really great!! I love it and can’t wait to see it when the interior is complete. It should make for a great camping trailer.
Nicely done!! (double thumbs up)
Why are almost all of the “You might also like” links under the main articles dead links ? ? I’ve been meaning to comment on this for awhile but I got reminded today as I tried clicking on all five of the links and every damn one was dead – Nothing there – – “Sorry, We can’t find anything that matches your search” – – and it is that way approx 89% of the time.
All the links worked for me. Maybe they timed out, I’ve found the site is sometimes a little slow. Give it another try.
This man is an artist! Beautiful work, looks very light. I cant wait to see what you do with the inside!
The skin is hand-made paneling. I started with sheets of 1/4 inch ply, with one clean face. Then I made a jig and routed the grooves with a Whiteside #1572 bit. (Look through the pictures on the Flickr site…I think I posted a couple that show me routing out these sheets.) Each pair of grooves requires two passes, and then, when it’s all done, you have to sand the grooves. For that, I just folded a strip of sandpaper over a thin 12-inch steel rule and carefully sanded all the fuzz off. I think I did this for about 8 sheets of ply and it took hours and hours and hours (and then a few more hours.) It’s not something you want to do unless you’re really particular about what you want. Also, the plywood is about as flimsy as paper when you’re done and you have to handle it very carefully until it’s attached to the steel. But after it’s attached and the ribs and everything are secured to hold it in place, it forms a strong skin. If you’re REALLY interested, I can supply you with dimensions for the jig.
I wish I had your patience!
And I wish I had your sanity! 🙂
That’s a great looking vardo! I seriously considered doing a metal frame on the one I’m building now, but decided on a wood frame. I’m not as far along as you and I’m going slightly less traditional (and bigger, 16′ x 81″ floor) in design, but your overall design is very similar to mine. You can see my progress at buildingjourney.com if you’re interested.
I’m eager to hear how the trailer works in practice once you’re done. Great job so far!
Great job Darrel. I saw your photo stream on flickr,you are one talented guy. I’m always amazed by the high quality coming out of home garages. Is the skeleton made of 1×1 steel tubing? Did you bend the top bows yourself? One of the flickr photos looked like you and your son were bending them yourselves. If so, was it difficult? Awesome teardrop too.
Hi TJ,
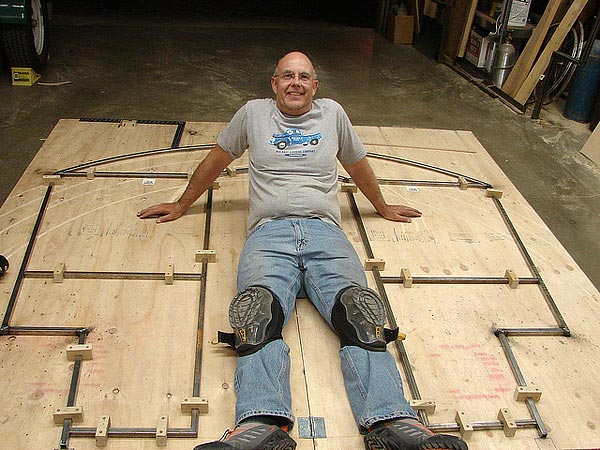
Thanks for your comments. The steel structure is 3/4 square steel tubing. The top bows were bent by my son and I (mostly me, but I wanted Nathan to be able to take a swing at one of ’em). I built a big form out of MDF, cutting the arc with a router on a long aluminum trammel. I started with a wide arc and kept cutting it down and bending steel on it until the bow was the radius I wanted. You can see pictures on Flickr of that process. The steel springs back slightly, and you have to account for that. However, if you buy all your steel from the same mill run, it’ll all bend predictably. After I bent all the bows, they were spot on identical. I screwed the mdf form to an old entry door. One-inch nominal pipe legs support the makeshift bench, and the bench was bolted down to my RV pad with studs I sunk into the concrete. After I was done bending the bows, I disassembled the bench and broke each stud flush with the concrete with a mighty swing of my 16-oz. ball peen. Don’t want to be tripping on those things all year! The 3/4 steel tubing bends remarkable easy. I had called a few places around town that had large capacity tubing benders and such stuff, including a boilerworks. Then I stumbled across a website (as is so often the case! Go to http://metalgeek.com/archives/2005/05/01/000047.php to see it for yourself.) It looked doable. You’d be surprised to see how easy it actually is. The hard part is getting the arc on the MDF form just right. That’s a lot of trial and error–and MDF isn’t exactly light. Someday I’ll post the construction pics of the teardrop.
Hello Darrel,
I am so excited to see this post! I am finishing the design stages of a very similar wagon. I plan on my wagon being my primary home. Planning to frame it out of steel pipe almost exactly like this. I was curious what size pipe you are using and how thick is it? Also, what did you decide to use for windows?
Thanks for your time, this is such an inspiration!!
Rose
Sorry about that Darrel, I now just read all the comments which answer all my questions!
Rose
Looks Great Darrel! Im building a smaller modified Vardo http://www.mikenchell.com/forums/viewtopic.php?t=43094
I went with a side door because for its size I needed more storage space and want an awning to sit under and protection from rain. Vardo’s are becoming real popular!
deryk
Wow. Really nice with the steel frame. Ive pondered doing so (more so now that i have a little MIG out in the shop). How does the torsion axle ride? What is your tow vehicle?
Abel Zyl Zimmerman
Awesome… Love the steel frame with the wood over lay.. Two questions is the roof made of steel. It looks like one piece, yes. Is that 3M 5200 the wood is glued to the steel frame with or is that an epoxy of some brand. I see it is screwed too. You have given me lots of ideas , thanks.
neat work Darrel. The jigs are a great idea. I went the laminated ash bows route using a jig. There’s a video here customwooddesigns.blogspot.com
showing the interior.