Here’s a little bit of my tiny house building story and some of the things I learned in the process. I hope this information will help or possibly inspire a few future tiny house builders, in the same way I was greatly supported by all you guys who shared your stories before me. The best things about this project were the support I received from friends and family, and getting to learn so many new things this year.
Before I started I had a little bit of experience building. I’d built a shed or two and some homemade plywood furniture. Until a year ago, the stuff I built was almost totally designed from a functional perspective. But a few months before I started my project I had the good fortune to work on a backyard shed with my friend Steve, who taught me all about using salvaged and old materials.
On my first trip to the salvage yard I had no idea how much things should cost, or even the difference between redwood and fir. A few weeks later, the idea of taking a little extra time to find beautiful materials and design things a bit more uniquely was starting to make sense to me. Turns out interesting and older materials (usually cheaper, and almost always more time consuming to get) really impact the feeling of the house.
In order to get from the little experience I had to being comfortable building this thing, I relied on a few key online resources, including Dee Williams “Go House Go“, “The Tiny House Construction Guide” and a great video from Tumbleweed showing the building process.
At first I was hesitant to pay for those e-books, but I quickly came to my senses and realized the cost would more than pay for itself by saving me time and money spent making big mistakes.
I designed the house myself, using Google Sketchup (which I had learned earlier that year for a couple other personal projects.) Of all the computer programs I’ve learned over the years, Sketchup has the best instructional videos I’ve seen, so I would definitely recommend it to non computer experts – a few days of practice and I think anyone could design their own house with it!
A few notes on the design of my house:
- I did a rough design based on the property I was planning to move to first. This was before I had the windows or any other materials. Then, after a month of searching to locate windows and doors that were roughly the correct size, I did a final design with those measurements.
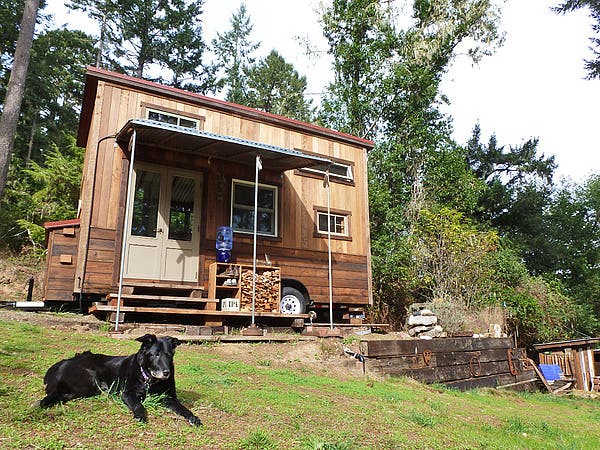
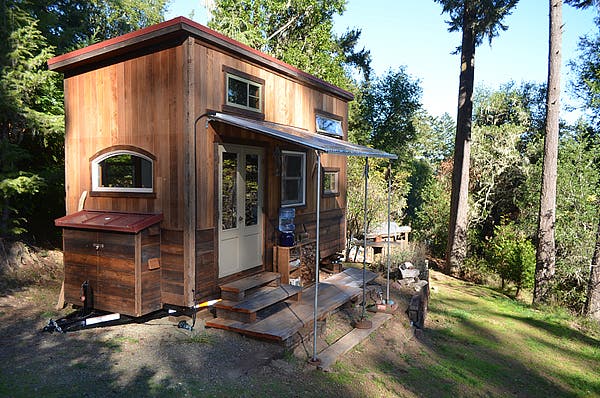
- I chose the shed-style roof because I’m really tall and wanted to maximize loft-space. And I definitely wanted a couple of windows in the loft, so I could gaze out while lying in bed.
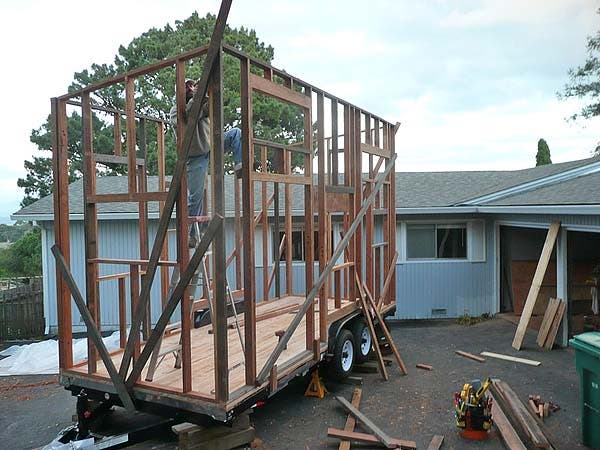
- It’s on a standard 8×18′ “car-hauler” trailer. The manufacturer was willing to add some welded on “wings” so I could make my house wider, in exchange for not including some of the extra metal (d-rings, etc.) that usually come with such a trailer.

A few notes on materials and systems:
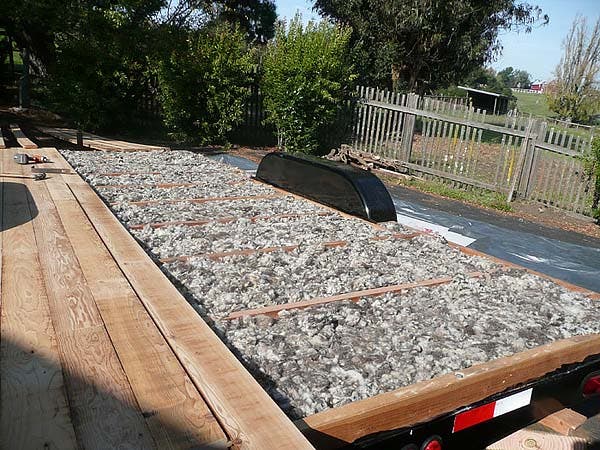
- Insulation in the floor, walls, and ceiling is wool from Oregon Shepherd, which I read about from Tammy Stroebel’s project built by Dee. It was time-consuming to install, but otherwise a total pleasure to work with.
- Downstairs floor is reclaimed 1 1/2″ tongue and groove fir, upstairs floor is 3/4″ fir – both from a great salvage yard in Windsor, CA.
- Exterior is two batches of T+G redwood. One had been sitting unused in a friend’s landlord’s barn for 30 years, the other from a salvage yard in Petaluma.
- Interior wainscoting is that same 30 year-old redwood, with tongues and grooved ripped off.
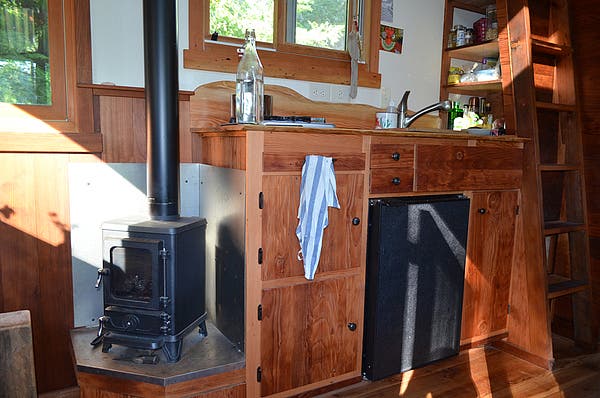
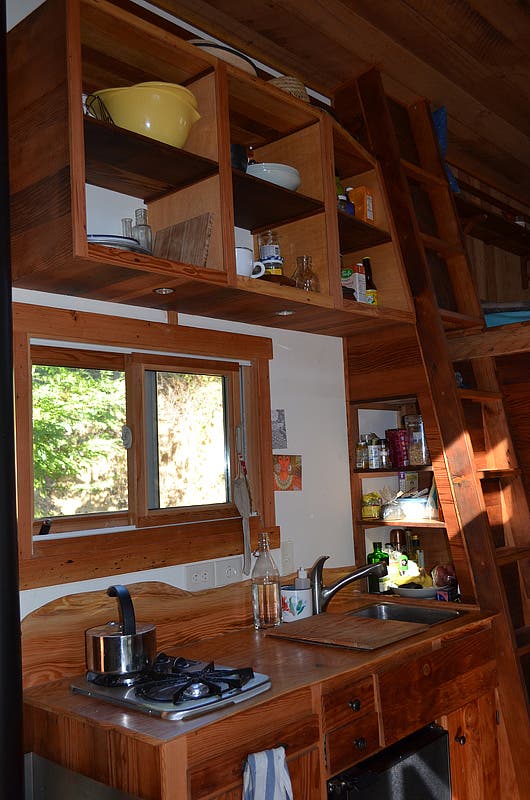
- Ceiling, and much of the kitchen cabinet, is reclaimed fir from a house on the Russian River that was pulled apart by a carpenter friend. I re-sawed it in half, from 3/4″ thick down to about 5/16″, thus making a lighter ceiling and giving me twice the material. I used the same technique for the redwood hallway walls and closets.
- White walls are 1/4″ plywood from Home Depot. I went this route thinking that plywood would be lighter and stronger than drywall, and would add more visual light and less all-wood-monotony to the room. So far so good.
- Water heater is 10 gallon RV tank-style heater. My research seemed to say this was going to be more efficient than tankless. It’s still hard to believe that’s true…I might go tankless next time. But this does work well and I can take piping hot 10 minute showers.
- Fridge is high-efficiency Novakool, powered by AC or DC. (currently running on DC)
- Wood stove is “The Hobbit”, by Salamander Stoves of the UK. It’s an amazing stove, and from my research was cheaper (and more attractive) than similar small US-made stoves. Can’t recommend The Hobbit highly enough.
- Water system includes two parallel supply lines: One for “city” water, if I’m hooked up to a friend’s hose, and one for “gravity” water, with an RV water pump to boost the pressure in case the incoming water doesn’t have enough. (Which is the case at my current semi-rural location.)
- Electricity is 100% solar, coming from two 225 panels and six Trojan
- T-105 batteries. House has AC and DC lighting. (Water heater, fridge, and RV water pump are also DC.)
- LED tape lighting around the upper part of the walls is super-efficient and can’t be beat for creating a comfortable ambience.
The schedule of my project was roughly:
2011:
- September 2011 – research and design
- October 2011 – gathering materials (especially lumber, windows and doors, and the trailer)
- November 2011 – January 2012: building the outside and getting waterproof
- February 2012 – March: researching plumbing and electrical
- April 2012 – plumbing, electrical
- May – June 2012 – interior
I did most of the building myself – but early on I decided that while my pride wanted to be able to say “I did it all myself,” that was actually a recipe for loneliness. So I begged and traded for as much help as possible, and was blessed to know incredibly skilled people who sped up my learning curve immensely. In order to feel any degree of confidence that my house wouldn’t fall apart, my contractor friend’s advice made all the difference. Tony sacrificed his back-health to get the four walls up, and freely offered consultations on everything from solar to framing to, well, everything. I would have imploded or gotten totally stuck on the electric and the plumbing, without help from Jim and Michael. Bruce and Duncan shared tons of amazing cabinetry and furniture-making wisdom, as well as the use of some pretty deluxe tools. I had a great time working with both of my parents, who each stepped in and helped me with many crucial aspects of the project. And four amazing angels shared with me their beautiful property on which to build my house, and gave me a room to stay in until my house was liveable.
I’ve tried to keep this story brief, highlighting practical information for future tiny-house builders, but I did a ton of research (thank you tiny house community!) and I’m happy to share more about anything. Ask any questions you like in the comments section below if you’re building or thinking about building your own tiny house.
This is the nices tinyhouse that I ever seen. Veryg good job.
As well as developing and building their Tiny, affordable homes, Eco Cottages is presently working with Government and other advisors to introduce new legislation specific to Tiny Houses, to embrace protect them as an affordable housing solution, where Councils will be encouraged to make greater provision for their placements services including red zone and other wasted land areas.
Wow, thank you so much for sharing the process. Your tiny house looks great! 🙂
Absolutely beautiful! The exterior is so pretty and unique. I love the sunburst design in the loft and on the front of the toilet. The whole house is very cozy and appealing. I could certainly spend a winter huddled up in front of that adorable wood heater. Great home! Thanks for sharing with us!
That wall in the loft with the sunburst motif is brilliant!
Wow, great work and great story. Love the details. Thanks for sharing.
This is beautiful! So many lovely features — but the varying size and design of the windows is one of my favorites, especially the long narrow one that adds so much light to what could be a dark “hall”. I also like the design of the ladder. It seems very sturdy and useable, even for a ladder-phobe like me. I was thinking that if it were mine I would cut some handholds into the treads and that would give me something to hold on to even on the darkest mid-night trip “downstairs.”
good idea about the handholds. luckily i thought of it too – they’re in there and quite necessary.
– colin
Well done Colin. I love your design and the way you have presented your project to us. I particularly like your schedule/time line, I think that will give many DIY builders confidence to take on their own projects and believe they can actually complete the house in a reasonable time. Your craftsmanship is excellent. Thanks.
Hey, thanks for writing in! We’re looking at woodstoves now for a tiny house: could you tell me what your total cost with pipe and shipping was for yours (not including sheilding)? Thanks!
hi – the hobbit stove was almost exactly $800, including shipping from england, and the chimney, which is 4″ pellet stove pipe, was about $300. (google “4” woodland direct pellet vent pro cathedral ceiling chimney system”)
What’s your roof pitch? I’m planning a shed roof also, love the way yours turned out. It’s nice to see that a shed roof house can look so good as up to now I was having doubts. Between this and the Oregon house the other day I’m getting more enthused.
the roof pitch is basically 1:12.
– colin
Did you need any extra support on the framing of the 8ft walls? Planning to do a pitch similar to this and wasn’t sure if I’d need any cross bracing (I think that’s the right term…)
Beautiful work, you have a real eye for detail and making it all come together.
Such a great design. I love your tiny house and the setting where you parked it.
I also love your point about building it all yourself could equal loneliness. I agree and building a tiny house with friends is such a rewarding experience.
Thanks for sharing your story!
This Tiny House is the best one I have yet seen (besides my own…lol). The attention to detail is incredible. The wood stove is the only one I have seen in a Tiny House. I am still planning on getting mine before next winter. I wish I could see more of the shower and closet. Kudos to you for such well thought out home. Your ladder is the best setup yet.
Awesome.
The shed style roofs on tiny houses make alot of sense. This is an awesome tiny house with some really neat details. Awesome work!
What a gorgeous house! Congratulations! The passion and hardwork you put into it really shows.
As I continue to design my tiny house, I think I will use some of your tips. I really love the tall window at the back, makes it feel brighter and more open!
As for tankless vs tank water heaters, my neighbor switched from tankless back to a tank heater in his RV. He said it took so long to get hot water and after you turned it off and back on again, it had to reheat. He felt like he was wasting water to save gas. Water is more expensive than gas!
good to know…thanks for making me feel better!
– colin
What about “Hot-Water-On-Demand” systems? Anything I’ve ever heard about them has been good. Anybody know of any drawbacks to having a HWOD system?
Thank you for sharing this tiny house with us. There are so many admirable appointments! I love the reclaimed windows. I have salvage windows in my vardo. Your attention to detail adds a beautification quality all its own. Excellent job!
A home run…….love the fanned interior woodwork, the stove placement, and the layout. I might be worried about it being so tall and top-heavy if I were to transport it at all, which might not be your intent, especially when crossing bridges or taking tight turns, but otherwise, its a damn magnificent piece of work. Congrats, be proud, and enjoy! Thanks for sharing with us.
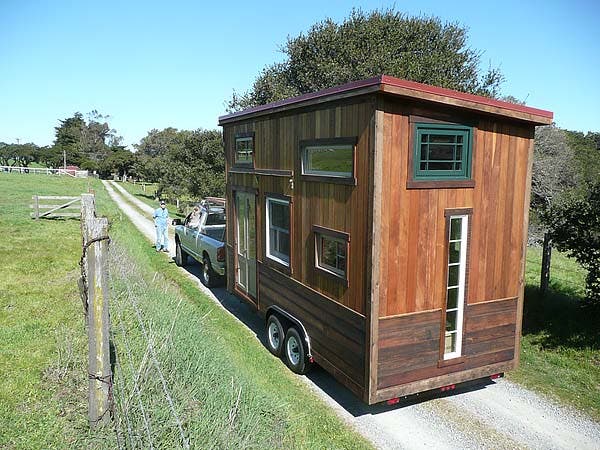
yes – i was worried about it being tall and top-heavy too. but so far so good…i’ve moved it twice (a total of about 45 miles) including on some windy and bumpy country roads and it hasn’t tipped over yet. :)colin
Wow, this is a very nicely designed home! I love the sunburst around the window in the loft – what a nice touch!
AWESOME! I’ve looked at hundreds of these houses online and even a few in person, traveling a great distance! While I cannot at this time build mine as I live in West Los Angeles, I know that post-college paying off my debt will not be as hard. What other reason would I have to leave the military but the same in smaller-post-war housing…to get my own home and life, right?
I did have a question for you. I noticed the height and was elated to see it, as I have been dreaming of a higher loft, maybe a second story. I know myself and know that hitting my head on the ceiling has never been my thing. It’s good to see that you can make it higher, did you have to get a special permit? If so, how much did it cost? If you did it under-the-table, say no more!
I guess there’s nothing else to say but WELCOME HOME! And maybe someday I’ll get tired of Southern California, especially cause owning a home here is a dream, and living in something like that here makes you…well, weird. Not in a good way.
hi – i guess it does look taller than some tiny houses, but i’m pretty sure everyone builds to the 13’6″ limit, just like me. i think mine just looks taller because there’s more house above eight or nine feet. no special permits needed. 🙂
Good job. Interior is rustic and simple–the way I prefer a Tiny Home to look. Love the wood stove!
Everything about this Tiny Home is perfect. Reclaimed materials, mix of off grid devices and grid accessibility, sensible insulation, good use of windows, dark exterior to match surrounding environment, etc.
I think if you’re a newbie to Tiny Homes and don’t have a deep wallet, this is probably something you should aim for.
where did you find your Hobbit stove in the US?….i have been looking all over and can only find the UK store…thank you.
hi – i got it from the salamander stoves website, direct from england. they were really nice and helpful and perfectly happy to sell to the u.s.
– colin
Absolutely love this. I too am going to build a house with a shed style roof. Love the use of reclaimed wood! I really hope I can find similar sources of reclaimed materials. Nice choice on the Nova Kool fridge, too! I just looked at those. They are pricy, but tempting. Well done! Your an inspiration!
Lovely craftsmanship and I agree with the loneliness advice. You made the right choice getting friends on board your project. It is gorgeous with all the details. The little stove is soooo little, I can imagine it takes very little fuel. I, too, wonder about turning corners. Also, wondering about total cost 🙂 Exquiste!
total cost was about $20k. yikes!
:)colin
Nicely done Colin! Seems we have very similar tastes. I am building a shed roof cabin on wheels and using reclaimed redwood as well. Your choice of recruiting friends would certainly speed up the project. I am amazed at your time line, great job. I have chose to do it all myself and I think I will have 2 years of my time invested by the time I finish. That sounds like a lot. but I am having loads of fun.
Oh and great choice on the Hobbit wood stove I have one as well. What a great stove! well worth the money. I cant see a flue dampener in your picture maybe you have one? If not there only about $10 and give you even more control of that little gems heat output.
Beautiful! Love the interior wood. We bought a Hobbit for our tiny house build as well. Where did you find 4″ stove pipe? So far we’ve only found it from the folks at marinestove.com, and the chimney from Selkirk in Canada. Would love to have any advice or leads on this.
hi, got the pipe from woodland direct. (google “4? woodland direct pellet vent pro cathedral ceiling chimney system”)
Thanks for responding to all these questions! Have you tried it out yet, or experienced any problems with off-gassing? From what I understand, pellet stove pipe isn’t built to withstand the kind of heat wood stoves can produce.
that’s a great point and i’m glad you mentioned it because i forgot about that! indeed the pellet stove pipe did off-gas like crazy! on the first use the hobbit was humming along when suddenly the whole surface of the pipe shot out clouds of horrible-smelling gray smoke. we had to open the windows and leave for a few hours. since then it’s gone away completely, and now when the stove is hot there’s no smell or anything from the pipe. so, whoever told you pellet stove pipe might not be able to handle it knew more than the people (including the hobbit manufacturer) who recommended it to me. at this point i think it’s fine in my house, and perhaps usable for any small stove if you crank it up to heat in the driveway before installing it….but who knows, maybe i’m getting cancer every time that stuff gets hot? i’d be happy to see any links you have to more info….
Salamander Stoves also recommended 4″ pellet stove pipe to us, and we were kind of shocked to hear that from them. Galvanized steel is definitely NOT okay to use with wood stoves, since the zinc coating will burn off. Zinc is poisonous, and it means your pipes will probably rust now that its burned off. I’m glad you didn’t get sick! Also, what does your chimney set-up look like? Pellet stoves rely on forced draft (instead of natural draft), so I wonder if you stove might not be drafting as well as it could be.
Hey Colin,
Not sure if you’re considering changing your stovepipe/chimney setup or not, but we recently ordered the chimney for our Hobbit and FedEx dinged it up pretty bad. Here’s the listing on Ebay
http://www.ebay.com/itm/Selkirk-High-Temp-Model-HT-4-Insulated-Chimney-/151026956435?pt=LH_DefaultDomain_0&hash=item2329e87893
Best,
Esther
I love this design! Will you put it into a plan for sale?
Beautiful job and so cozy. LOVE the wood stove too. Thanks for the great info.
Thanks soo much for the inspiration and perfect details!!!!!!!!!! Really loved reading this the way you layed it out and the house is amazing!!!!! Gorgeous! Well done! I love your epiphany on the support and to hear how abundant it was! And also really digging the salvaged materials…where are you now? Ca? In WA state and planning to begin a build by this summer. If you feel compelled drop me a line at loveisourpurpose@gmail.com so I can pick your beautiful tiny build brain some more. Really thanks for sharing this! Love, Maggie
awesome, awesome, awesome. well done, man!
You have incredible skills and you being so forthcoming with your process and your advice is tremendously helpful and what I love about this tiny house community. I have plans to start my build in May! I feel more confident after reading your posting. Do you have a blog? This is a wealth of information. I will be back with questions but first and foremost thank you for this alone!!!
My favorite tiny house ever. Thank you for sharing. Smart and beautiful design… you research and thoughtfulness paid off big time.
Beautiful and very inspirational! Please share whether you needed any special permitting due to height? I assume this is registered as an rv?
Thanks for sharing your experience and the photos.
hi, not sure if people check the whole list of comments so i’ll copy this answer from similar question above…i guess it does look taller than some tiny houses but it’s just under the 13’6? limit. i think mine just looks taller because there’s more house above eight or nine feet. no special permits needed.
Looks great….what was the final dollar cost out of pocket?
I am so envious!! 🙂
I love this house! thanks for sharing. I love the 6×6 for a drink rest..use it baby!
😉 good eye!
Very nice work. Many thanks for sharing the process so intimately…very inspiring and wonderful helpful information. Would love to see your tiny house “live”! Are you in Sonoma County? When you mentioned the salvage yard in Windsor and then another resource in Petaluma…my heart leapt! If you’re up for a visit and short chat I’d love to come take a look.
Again, thank you for sharing this wonderful story and the process of building your beautiful home.
I’m planning on doing the white plywood as well and I’m happy to see a tiny house with lots of and bigger windows, I’m doing that as well.
I will eventually be completely off grid, but am planning my home to be able to be in all situations.
Great job and thank-you for sharing.
Oh, I forgot to ask, now that you’ve been in the home, how is the wool insulation working for you? Do you have any condesation issues?
hi, the wool insulation seems great. the house stays warm in winter, cool in summer… no condensation issues. though it should be noted i don’t have an indoor shower, which makes that a bit less likely i would think. so far so good.
Hi Colin!
Thank you so much for sharing your house with us – it is a beautiful piece of craftsmanship! I love, love the ladder/kitchen shelf combination. I’m curious to know about the measurements of your house, particularly how tall it is, and where your house is located? I love the idea of wool insulation, but since I live in Sweden where the winters are really long and cold, I’m not sure that would work for me…
Anna
hi – the house is 18′ long, 8.5′ wide, and 13’5″ high off the ground. my trailer has a “drop-axle” which makes the bed a bit lower…so inside the ceiling is about 10′ on the low side and 11′ on the high side. regarding insulation…my research seemed to indicate that wool had basically the same R value as regular fiberglass. it doesn’t get that cold where i live in northern california (only down to just below freezing occasionally). i think the insulation would be fine for colder climates…you just might want some kind of heater that can keep the house warm-ish overnight…this small stove can only burn for about 2 hours without being re-stocked.
Also,
is your toilet a sawdust one? Do you have any pros and cons to share on that? Thanks!
Nice design Colin! Love the open feeling and the height makes a big difference. LOVE the starburst in the loft and bath. So much visual interest. The wood, the wood! Gorgeous 🙂 A real labor of love! Echoes of Leaf House? Enjoy your home.
This is probably the nicest tiny house I’ve seen so far, well done!
Congratulations! This is absolutely exquisite and the salvaged materials really do set it off …along with the sunburst patterns. Enjoy your new home. You deserve it! And don’t let anyone tell you you’re “lucky”!!
Hi, Colin.
I absolutely admire your “Tiny House”! I have a 2003 Crown Victoria Police Interceptor, 4.6L V8 with Police Programming of the ECM/Computer, and I’m planning on doing a heavy duty tow hitch addition to my vehicle. I’m wondering, though, what are the weights of your building? I am fully willing to sacrifice on looks to make up for trimming poundage, but I am in love with your design. Thank you for the post, and I would love to converse with you privately!
73’s de Zach, KC0CSB, Central Kansas
hey – the house weighs about 9,000 pounds. which is 1,000 less than the trailer is rated to carry. not sure what the tongue weight is, but i think it’s reasonably well balanced. i think my house may be a bit heavier than most due to wood windows, double door, and lots of heavy window headers….
Colin
As I have been building my little house the question of weight has crossed my mind constantly. Your house is very similar in size and the materials used in the shell as well. How ever I am building a LOT of built in cabinets and all the furnishings will be built in as well.
I was wondering if the 9000 lbs you gave was as we see it in the pictures more or less. Or if that number was as lite as you could reasonably make it for travel? figure I
hi – regarding weight…it’s 9000 lbs pretty much as you see it. as for built-in furniture this house a little bit…a couch/bed, and of course the closets and kitchen cabinets. last time we moved it i actually left the awning on (it folds down against the side but could be removed) and even the solar batteries in the front storage area. i suppose i could pull about 500 pounds off for the next journey if needed…
wow. what a great tinyhome. my girlfriend and i have been looking for a side double door entrance and sloping roofline just like this. thank you for all the great documentation. i will definitely be coming back here for inspiration. nice use of reclaimed wood and and creative radial slats.
That is one crazy beautiful handcrafted home. You and your friends did marvelous job of making your vision a reality.
hi & thx for that story.. it came out really nice!
i love the stove- and the bed area!
did you ever consider a flat roof or a monopitch roof?
thx!
erik
hi – i considered lots of different roof pitches…though i don’t think flat was on my list, and i’m not sure how monopitch differs from shed…maybe sloping front to back? i wanted to do a curved roof, thinking it would be easy to find salvaged curved corrugated from some old quonset hut. in the end i decided a curved roof and curved rafters was one extra challenge i didn’t need to take on. thanks for your interest! – colin
Great Job!!!!!!!!!
thank you for posting this beautiful creation of yours. ive dowmsize big time myself. i build a 20×20 two story cabin, and i love it.
im in the process of deciding a floor plan for a 8×20 small home for my mom. id love to be able to see your floor plan if possible. really love your design, can you please email it to me? thank u again for sharing ur small house.. take care
Colin, what a beautiful tiny house! Very well done both on the general design and layout, which seem to let in a lot of light, and on the details – the sunburst designs in the loft and bathroom are simple but lovely. Thank you for all the pictures!
This is my favorite Tiny House to date, most especially for the mindset of the builder and the sincere care that is shown in the build and the thoughtful sharing with the Tiny House community.
This story epitomizes the Tiny House movement for me. Great job.
Truly, a tiny house worth emulating
I really like this house. Thank you for sharing how you made it.
Hi Colin,
Your small house is one of the finest examples that I’ve seen on this blog. I’ve been in the building trades most of my life and it looks to me that you’ve done an excellent job in designing and building your house
Jack
Hi there! This is kind of off topic but I need some advice from an established blog. Is it very hard to set up your own blog? I’m not very techincal but I can figure things out pretty quick. I’m thinking about creating my own but I’m not sure where to start. Do you have any points or suggestions? Cheers
Do your research on Youtube. There are lots of videos that show you the process. It’s not that hard but is nice to have step by step guidance and there is lots of that on Youtube.
Hi Collin,
As everyone has already said, great job, and I hope you are enjoying the satisfaction of living in such a wonderful homemade home. I’m in the middle of my own tiny house construction project and was wondering about your choice in wall covering. Specifically, how did you deal with the seams in the plywood? I really like the look, but have always been concerned about expansion/contraction issues and how to hide the seams.
Thanks,
Paul
hi – indeed the seams are a bit of an issue. i used a type of caulk called novaflex. (because i was going to paint the wood with an old fashioned type of paint called “milk paint” and was told by the seller of that product that it needed to go onto a non-vinyl surface.) if you’re just using regular paint, i would guess that vinyl spackling compound would be a good solution – easier to sand that what i used. in any case, you’re right that it was difficult to hide the seams and indeed some of them do show up a little bit.
Stunning! Great job!
Great house and fantastic finish work! Is the porch cover the solar panels?? Does it fold down against the side of the building for transportation?
hi – yes, the porch awning does fold down for transport, or it could be removed…it’s only held on by 3 brackets. (last time i moved the house we folded it down and left it on there.) and yes, the solar panels are affixed to the awning. that way the doors and big windows on my house can face the sun, but also the panels, sloped the other way, can face the sun. 🙂
wow! this is a great great tiny house! i love your sunburst wood details (loft/toilet). is the house standard height? and is the bed fit left to right rather than front to back? great ideas! i’d LOVE to see more pictures 🙂
yep – the house is standard height. (about 13’5″) and the bed does indeed to left-right. so my head is by the window and the good view. 🙂
Very nice look and style! You have done your research and created a great design for living. My hat is off to you. Love the design quality in the woodwork!
Love this! We are in the design stages now and see many features of your home we like. Thank you so much for sharing.
The radius’ you put behind the bed nd the face under the toilet are a great look. I’ve angled boards like this on a table saw, screwing them to another board askew and running the overlap thru the saw. Not sure if that makes sense. Is that how you did it?
hi – thanks! as for how i did it – your idea sounds about right, but i was really lucky to be working at a woodshop where they had a “sliding table saw”, which has a whole half of the table that slides, thus enabling you to just hold the wood against that half at whatever angle you want and cut it, without using a second guide piece or anything.
It easy to cut the pieces of the fan on any table saw with an angle guide. You could cut a scrap piece of wood at the angle you need. Or you could build an angle guide from 2 pieces of _straight_ 2×2 (or 1×3) connected with a hinge and slotted cross piece. Or you could buy an angle guide online. Push the fence wide enough so that the wide part of guide goes through easily. No screwing or clamping needed. To keep the good piece from sliding attach a small block to the end of the guide leg that is not on the fence. The angle can be easily repeated to cut all of the pieces needed.
I love this Tiny Home. I learned of 2 new products the stove company and the wool insulation. I have been looking at Roxul insulation for our cabin build. I really like the use of reclaimed lumber. I think that is very good for the environment. It is great to be in an large populous to find access to such products. We reside in South Dakota, not a great deal of easy access to reclaimed good. But we have looked into it. Congrats.
Absolutely out standing, the use of solar, the interior details- Fantastic job
I love your little house and your story, I wonder if you would be willing to share you budget. I am often inspired by these projects but knowing how much the supplies cost would be helpful. Of course time and effort is the biggest investment I’m sure!
It is beautiful!
This is the first tiny house on wheels that has inspired me to comment. I love the starburst designs on the loo and on the window wall.
You’ve done an exceptionally awesome job with design and with using scavenged wood.
Thank you so much for sharing.
Hi Colin,
Really nice job, your house looks like it would be a joy to live in. Some questions for you, you mentioned LED tape lighting and there is a link to the manufacturer, but could you tell us what model you used and whether you would go with that again or switch to another model? I’m really intrigued by this idea. In the past I’ve lit rooms with xmas tree lights and really liked the even distributed light they provide, but this seems much classier and more efficient. Less of that college dorm room look.
Thanks much,
Scott
hi – regarding LED lighting, i’m not totally sure which version it is (my electrician friend picked it up for me). i am pretty sure it’s the “fluid view” strip light, in the warm color, and i am sure i got the lowest wattage available. (i think it’s 1.6 watts/foot). it’s really great – and all you need is a little piece of trim up near the ceiling, and then you stick the strip light on top of that, and it creates a perfect amount of light without any bright source to catch your eye anywhere. it runs on 12 volts, so you need a little driver to switch over from 120V AC…anyway – a couple of things (the trim piece and the driver) that need to be factored in when wiring your house.
Makes me want to get out my tools and get building. Is the shower in the same space as the toilet?
Also do you find the floor insulation enough for the winters under your feet?
hi – the shower is outside. plumbed through the wall from the same room as the toilet. i’ll try to get some pictures of that up here one day. the insulation seems to be plenty in the floor. on cold mornings the house is cold, simply because the stove doesn’t go all night – but i’ve never felt the floor to be the source of that cold. 🙂
A simply amazing tiny house and I love how the reclaimed wood looks and how you were able to do what I will call “rising sun” like patterns with the wood. I furthermore love the fact that you put a window in the loft.
Thank you for Sharing!
Colin,
Stunning Job! Why did you choose to run double plumbing lines rather than just a short valved “bybass circut” for the water pressure pump?
Nice Guitar!
hmm, perhaps i didn’t state it clearly, but indeed a bypass circuit is what i’ve got. not two complete sets of plumbing. 🙂
Bravo – this house has everything – interesting, reclaimed materials, solar, owner built and STYLE!
I was thinking that the site got taken over by people trying to sell things and was getting pretty boring – then this!
I am impressed. Thank you for sharing.
Hi I am in the beginning stages of my tiny house and wondering what kind of budget you had for your tiny house.
I really like your tiny house. Could you send me more pictures of what the inside looks like.
Sincerely,
Elliott
I’ve always found wood toilet seats to be a little… unhygienic. Wood is so porous!
If wood is good enough for food preparation – cutting boards, it good enough for taking the browns to the superbowl…. I think varnishing the wood should cover your concerns.
Stunning house. I really appreciate your sharing the fascinating links. I live on the Mendo. Coast and some of your referrals are nearby. I will check them out. Thank you.
Love it!!! Wish I could see where the shower is…
Wow, great little house. I love it. This is definitely the way of the future. Congratulations on the article too. Informative and entertaining.
Nice job on the sunburst pattern. Very nice little home! Thanks for sharing.
hi – regarding LED lighting, i’m not totally sure which version it is (my electrician friend picked it up for me). i am pretty sure it’s the “fluid view” strip light, in the warm color, and i am sure i got the lowest wattage available. (i think it’s 1.6 watts/foot). it’s really great – and all you need is a little piece of trim up near the ceiling, and then you stick the strip light on top of that, and it creates a perfect amount of light without any bright source to catch your eye anywhere. it runs on 12 volts, so you need a little driver to switch over from 120V AC…anyway – a couple of things (the trim piece and the driver) that need to be factored in when wiring your house.
Hi Colin,
This has really inspired me! It’s beautiful — like a a great piece of furniture. Would there be any way that I could come over and see it? I live in Walnut Creek but could be there almost anytime that might work for you and I promise to be respectful of your time. The thing is I went to the Tumbleweed seminar in Sonoma last Oct. but honestly came away a bit intimidated. I have some construction experience but this just seemed to daunting. SO I was inspired by how you got it done and would really like to see it in person and maybe ask you a couple questions. Let me know if you would want to do that! — THANKS! – Shawn PS: I will bring you lunch or beer or your snack of choice!
Need one STAT…how much? Need to transport it to mountains and to ocean….we live in NC and we have both. Maybe it’s tax deductable even as a second residence?
Linda
Are the plans available for purchase? I want!
Awesome work and awesome design!
I am in the process of designing a mobile dwelling and was looking for tiny wood stoves. That one is solved now :-).
What I am curious about, is what type of toilet did you install?? I can speculate, but am probably off by a mile, because I was thinking worm/earth toilet.
Could you please enlighten me?
Regardless, thank you for sharing a part of your life with others. I feel truly inspired by what you did.
Mack
Great tiny home I have just two questions. What is the slope of roof? and roofing material? It’s hard to tell from the pictures.
hi – the roof sloop is roughly 1:12, and it’s made of standing seam metal. 🙂
Love the creativity! Can you tell me more about how you set up the house for solar electricity? Any issues installing, getting permits or downsides living on solar that you have experienced so far?
hi,
the house has two solar panels on the awning. the batteries, inverter, charge controller, etc are all in the small storage cabinet on the tongue of the trailer. the batteries (which are configured at 12V) feed two different systems: 1) via an inverter they go to the AC electric panel, which feeds some lights and the receptacles, and 2) the batteries directly feed the DC electric panel, which powers the fridge, water pump, and some lights. that’s basically how it works.
there were no permits necessary. i was fortunate to have the help of an experienced electrician in choosing the equipment and setting it all up, so there were no major issues. living on solar power is great – but this winter has been really sunny. my setup can handle about one week of clouds before i run out of power, and that hasn’t happened yet. but in case it does, i do have a generator on the property to re-charge the batteries. (i would be fine just living on candles for a while, but the batteries need to be charged regularly to stay alive.)
hope that helps a little. freesunpower.com has great tutorials which can help you get into it a bit more.
Hey awesome job. I looked through the comments to make sure there wasn’t already an answer to my question but didn’t see one.
Is your toilet composting? What’s the “maintenance” like?
Is your water supply “off the grid” or do you just hook up to existing systems?
Thanks for your time!
I really like your tiny house, could you send me more pics and possibly send me the dimensions. I would really like to model my tiny house with some of the same features.
Sincerely,
Elliott Peart
Beautiful job on your tiny home, I’m really inspired!! Building my own “gypsy wagon” style trailer and I’m wondering about how you have dealt with ventilation. Is there a fan for cooking inside?
hi,
there isn’t a fan inside. just a window above the stove, which seems to work fine. i don’t have an indoor shower, which also helps avoid ventilation issues.
🙂
Colin,
I am COMPLETELY new to all of this, and I was wondering if you can guide a “newb” on where to start. First off I would like to know is it possible for one to purchase some land, and just place the home on the land with out code restrictions? I am wanting to move to Colorado and would love to start on a project like this, but do not want it to be in vain. 🙂 Also any websites or plans or instructional videos etc..(the cheaper the better) that you would recommend? Thanks for any all information, and anyone else that has experience or can help please feel free to respond also!
Thanks again!
Joshua
Awesome! I’ve been looking at these on this blog for a while now and this is a favorite – really think I could live here for a time. very inspirational. thanks for sharing!
Hi, Colin.
I am also building a tiny house in west county, and while I love it, I can’t say the workmanship will be anything near to what you’ve done. It’s beautiful!
I’m interested to hear how the interior wall paneling has worked out for you, a couple of months, and perhaps a move or two on. I’d thought to use sanded ply for the same reason, but am concerned about buckling at such a thin width. Have any issues come up for you?
Congratulations on such a beautiful home!
I’m not sure if you check this anymore, but this seems to be the only way to reach you. I’ve tried searching the internet for more info on your tiny house, but you’re pretty elusive. I’m hoping to find more pictures or even plans of your tiny house, anything to give me a better idea of the interior layout. Specifically, what other than a toilet is located in the area under your bed? I can see some storage, but it would be great to have a better idea of the specifics.
love the wood stove; love the house ….but do any ‘tiny house people’ wear clothes? WHERE do you put them??????
Come on…we do have 4 seasons here in the USA And that means down fluffy stuff!!!!
Carrie
i guess it’s not shown in the photos, but there is a closet under the loft. it’s about 1.5′ x 3′. there’s a pole for hanging nicer shirts on top (about 10), and the bottom half has 3 slide-out drawers that hold tons of clothes. then more hooks in the bathroom/storage area, and space under the couch. i definitely have enough space for all 4 seasons. admittedly, i have more stuff in storage, but that’s just so i can switch items once in a while and feel like i have new clothes.
🙂
Really beautiful little house! You should be very proud. And, thank you for telling me about Novakool DC fridges. I want a DC fridge but have not had good luck finding vendors. Also, I wasn’t aware there were any DC water heaters on the market. If you have the time, please shoot me a reply and tell me who the manufacturer was because I’d love to check that out as well. Big kudo’s for going solar as well. Wishing you peace and happiness in your new home.
actually the water heater runs on propane – sorry for the confusion.
🙂
Hi Colin,
Simply beautiful place you have there. I am also planning on building with a shed roof, wondering what your ceiling heights are for below/above loft are?
hi – there is 6’7″ of standing space below the loft joists, and about 4′ of sitting space in the loft. i’m 6’6″ and i can stand up straight below the loft and easily sit straight up on the thin futon mattress with room to spare. there’s about 1′ of difference between the high and low sides of the ceiling.
🙂
A beautiful house and made with reclaimed wood is an excellent idea.
Beautiful home, lots of info, and great pics. Job we’ll done
Hi, wow love the house. I am doing construction A-Level ATM and one of our project is to design a tiny house, I was wondering what wood you used for both the frame and the outside of the house. And also why you chose these woods over other types of woods. Thank you in advance.
hi, the frame is regular 2×4 fir. rafters all also 2×4. 2×6 rafters are more common, but i wanted the extra headroom, and figured the width of the house was narrow enough that 2×4’s could support the roof. the outside of the house is 1×6 and 1×8 tongue and groove redwood. that was chosen mostly for looks, but redwood and cedar are the main two options for exterior because they are weather resistant.
1) What type of freestanding stove did you install? What material does it burn?
2) The Porch awning supports your solar panels. What did you use to frame this support? How did you fasten it to the side wall?
Love your awesome tiny house!
hi
– the stove burns wood. it’s a “hobbit” stove, by salamander stoves in the uk.
– the porch awning is metal roof on a frame of 2×2’s. it’s attached to the house with some metal brackets i got at the salvage yard, and supported by regular 1″ conduit pipe. the solar panels are mounted to the roof with 1.5″ angle aluminum.
🙂
I love your house.It makes more sense that the shed type roof is used than the many faceted roofs that you see on many of the tiny homes. Your use of solar is commendable. Keep up the good work!!
This is the best I’ve seen yet on THB…most organized creative flow of thought and information….Thankyou.
,,,yes,…my question. Could you please explain the circumstances of the property? I think this is so basic and fundamental to all of us who have the same or similar ideas of tiny house living. Is it rented, owned, squatted? I believe in under the radar discretion but the legality of impermanent and movable structures is very important to this discussion. Thank you Much, tom
Hi! I love your little home. It looks great. We are about 1/2 way through building a tiny house. I like the ladder in the kitchen with storage behind. That gave me a total brainwave that I think will work in ours.
My real question is about the hobbit stove. We are thinking of buying one. I am just wondering what do you find the burn time is on that if you are burning say birch or a hard wood? Have you used it in a winter yet ( if you have winters where you live)? We live in a fairly snowy climate and I want to be warm enough. Did you just put aluminum flashing behind the stove with a 2×4 sub floor beneath?
so far the longest i’ve got it to burn without being attended is about 3 hours. that’s with some fir and oak. the logs are pretty small. it’s easy to get and keep the house warm, but for me not possible to keep it going over night. still, it stays sorta warm with good insulation and takes 30-45 minutes to get toasty again.
behind the stove is steel flashing, 1″ away from 1/2 cement board (w/ ceramic spacers – available at fireplace stores). below the stove is 1″ of cement board and then plywood.
hope that helps.
🙂
May I ask who you got the Hobbit through and also what is the chimney pipe size ( 6″ )?
Thanks ,
John
got the stove thru salamander stoves, online, and the pipe is 4″ pellet stove pipe, which the hobbit manufacturer recommended. an earlier commenter pointed out that my pipe might not be rated for the heat it’s getting. so far it works fine but i can’t say for sure it’s the proper solution.
my favorite TH ever. LOVE your creativity – you have a gift. thanks!
Hi Colin,
Your tiny house is amazing, most of them I find just a bit too small. Yours is perfect! I do have a couple of questions:
– What is the height of your house?
– Do you know how much it weighs? I am doing my research now and this would be useful information regarding the trailer needed.
– In what type of climate do you live? Like Heather, we have pretty cold winters here.
Would be freat to hear from you..
hi, height is 13’5″ off the ground. roughly 10-11 foot ceilings inside. it weighs about 9000 lbs including the trailer. definitely was worth it for me to get the trailer rated for 10,000 pounds. i live in a moderate (sf bay area) climate. rarely gets to freezing temp. i used to live in snow mountain winters and i think this would be adequate…but cold in the morning!
🙂
Kia ora Colin, Your creativity and attention to detail is astonishing! Above the bed, in the toilet. I am in Christchurch, New Zealand and I have just started my journey to create my own Tiny Home. Due to the amount of native wood and other salvageable items from the earthquake your explanation is invaluable. Thank you so much for sharing your journey with us so unselfishly it is truly appreciated. Arohanui ki a koe, Ariana
kia ora to you too – i love new zealand!
Thanks, Colin, for sharing your narrative. How did you go about finding a place to live permanently in your tiny home?
Hi Colin,
Your tiny house is inspiring and beautiful! I am looking into building one, and am wondering (sorry for the tacky question), what your budget was for your tiny house. I would be so grateful!
Thank you,
Lana
Oh my!!! Your house is so incredibly gorgeous! Absolutely lovely, and so unique. Clearly alot of thought, research and love went into it. The resuly is truly fantastic! Wish it were mine!!!
Hi Colin! I truly love your home! Your
utilization of space, & the layout
of your home is excellent.
If I were building my tiny home today,
it would be something like yours.
Right down to the off grid set-up.
Do you think you would consider
selling plans for Colin’s coastal cabin
( including solar set-up) in the future?
Thanks again for your generosity in
sharing your story! You & your home
are a true inspiration!
Thanks so much for sharing your
home building story
This is one of my all-time favorite builds. I just bought a new pickup truck for accessing and moving to my land, I wonder if it’s capable of towing a cabin of this size. *ponders*
i was really lucky to move this house with my friend’s new-ish full-size dodge 4×4 turbo diesel. that was good cuz there were some hills. lots of tongue weight too. my house would for sure need a big strong truck…good luck!
I’m ready to build something like this…at 50 y.o and NO pension…I have enough savings to have someone help me with my “Week-end warrior” skills build something like this.
If you’re willing to help me “almost duplicate” your home…let’s talk about this….let’s see if you would be interested to ‘act like a General Contractor” for me now.
Thanks,
Frank in upstate NY
I would suggest trying to get in touch with him personally. Often comments are missed.
Hullo– Your house is absolutely gorgeous. I love the look of the various woods in it. Well done. I have a question about the solar panels. you said tht they are the sole power that you have. How much electricity do you use? do you run a computer /radio, etc. on them, or do they just run the lights, basically? and do you run out of power and have to use something else, like a kerosene lamp sometimes? Thanks SO much.
hi – i have 2 solar panels (225 watts each) and 6 batteries. a pretty solid system for such a small house. probably $2000 total. with that i can run lights, radio, computer, and the fridge. the fridge uses the most power, but it’s a very efficient and very small fridge, so it’s not that much. i haven’t run out of power yet. but if it gets low i could stop using the fridge and buy some ice, and then easily make it til the next sunny period.
🙂
Where did you purchase your solar panels. ….
In Canada they are more than $2,000.
Thanks for sharing the photos as well. You have done an amazing job.
Beautiful tiny home! How does the toilet work for disposal of waste? The one thing holding me back from tiny living (aside from waiting for my kids to grow up) is the toilet issue. Growing up, we lived in a camp trailer while building our home. When the waste tank developed a crack and was too expensive to replace, Dad built an outhouse. I was thirteen, so somewhat traumatized by the experience, even into my 40s.
Thanks,
Carrie
Do u have a storage tank 4 grey H20, shower and toilet waste and have to go find a dumping station periodically,or a way to hook up to sewer? I’ve been living n my car for 7 yrs, & have no support network who can help me do this. I’ve literally been out handsawing pine trees on my little lot…but can’t play sole pioneer woman. Lucky u had folks who let u stay w/them and have some place to build ur trailer. I’ve been thru 4 Nat’l disasters and 10 yrs of theft. Wish I could find folks who would help me do that. Any ideas?
Hi…I think your home is beautiful. What more can I say. I have a question: I have a 21ft Prowler trailer that the roof is done. Could I strip this down and use the sink, gw tank, propane stove, propane fridge into my design (not at all in the places they are in the trailer design) Would the frame (the trailer its built on) be strong enough. It is a ’76 model so everything about it is heavy. I am only 5’1″ so don’t need the height overall that you have. Thank you, Nancy PS will be doing this myself.
Hi Colin,
Amazing job. I love the entire layout. Maybe I missed it somewhere along the way while reading, but can you tell me a little about the trailer you found, the dimensions of the trailer and the house too, and what permits you’re responsible for or whatever else was required of you?
Hi Colin,
Your Tiny House is awesome! My husband and I are in the “final” stages of building our own. We want to purchase a Hobbit stove as well, but I’m having some trouble getting info from the company. I have a few questions for you if you’re willing to answer:
1) Did you order direct from Salamander Stoves?
2) Did you order an installation kit from them? If so, which one?
3) Did you install an air intake?
4) Do you have any lessons learned from installing your wood stove?
Thanks so much for your advice. I hope to hear back from you soon.
hi, i ordered my hobbit from salamander, via ebay. that’s where they sold them back then. i didn’t install an air intake – i just keep a window or two cracked open. usually the house heats up and i open more windows. i didn’t use an installation kit, but ordered 4″ pellet stove chimney kit from woodlanddirect.com. my lesson learned is that maybe pellet stove pipe isn’t rated hot enough for a wood stove – it off-gassed a couple of times. but 95% of the time it’s great. i read (early in comments for this post) that you can get stainless triple wall 4″ pipe. maybe look into that. check earlier in these comments. good luck!
hi, i ordered my hobbit from salamander, via ebay. that’s where they sold them back then. i didn’t install an air intake – i just keep a window or two cracked open. usually the house heats up and i open more windows. i didn’t use an installation kit, but ordered 4″ pellet stove chimney kit from woodlanddirect.com. my lesson learned is that maybe pellet stove pipe isn’t rated hot enough for a wood stove – it off-gassed a couple of times. but 95% of the time it’s great. i read (early in comments for this post) that you can get stainless triple wall 4″ pipe. maybe look into that. check earlier in these comments. good luck! 🙂
do you ever run low or out of your solar energy???? I’d love to be able to depend on solar energy alone, but I worry about running out. I really love your home and congratulations.
Love the starburst feature in the wood around the loft window and in the bathroom. They add architectural interest.
Terrific job on the house! Congrats.
Hi Colin,
I am currently in the design and research process of my build and have various sketchup models that I am always tinkering with …. However, I haven’t built one with a shed style roof yet and I’m curious (as I am also tall) what the height from the floor to the bottom of your loft is. Also the height from the loft floor to the ceiling on both sides. Looks like you have quite a bit of room to sit up in the loft. Thanks for sharing your build, I really like those sunburst wood stylings, nice work.
~Wes
hi – it’s 6’7″ to bottom of the loft, and about 3-4′ above the loft. i’m 6’6″ and i can stand below the loft, and sit comfortably on the bed. cheers. 🙂
Hi Colin,
I really like your home! I have a question about the stove. I have read through the threads about the stove so far. It looks like you have had it for over 2 years now. How is the stove now? Is it still working for you? Have you moved your house with the stove in place? Is there a certain process that needs to be done with the stove when you are on the go or moving your house?
Thanks!
Great house, we’re just starting our build, we have a tiny house specific trailer with 16″ o/c cross members,a little like the one in the tumbleweed video. In the tumbleweed house they put foam board directly into the trailer and then ply ontop. We will be using wool in the floor, but always see that people using wool seem to add wooden joists into the trailer for the wool. I am also concerned about what kind of waterproofing to use in the flooring construction. I would be very interested to know how your floor construction went together (more pictures would be awesome) and any advice regarding these concerns? Thank you so much.
Hi Colin! I also live in a little house I built myself, very similar solar set-up, not so fancy finishes though. Sketchup (and the local library) is the best! Let me know if you want to trade house-tours sometime!
Hi Colin,
I know this post is several years old now…but I am just finding your lovely home for inspiration.
wondering if you are still living in it? Also, whether you are available to talk more about building etc?
Hope to hear from you,
Best, Deborah
Hi Colin,
I love your home and wonder if you would be available to talk more with me and my husband regarding building? Thanks!
Deborah
thanks for the sharing this. you have great idea to developed the kitchen