In this post we will discuss the tools needed to construct your log cabin also how to create a log catalog of all your logs, seasoning the logs and five basic principals of construction.

1. Tools you will Need
- Chain sawBlock and tackle (6″ triple block)Hand winch or come-along
- Alaska saw mill
- Hammer
- Sledge hammer
- Brace and bits (if you don’t have electricity)1/2″ electric drill100′ of chain (3/8″ in 10′ lengths)600′ polypropylene rope 1/2″ diameter
- Carpenters level
- Hand level for shooting elevations (or Abney level)
- Rebar cutter
- Pick and shovel
- Post hole digger50′ tape measure
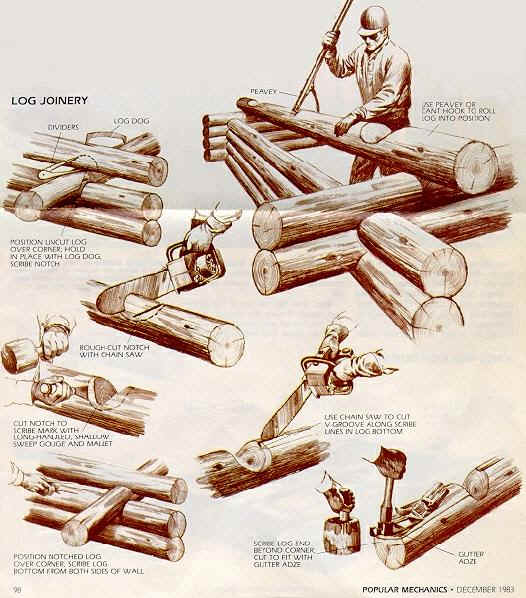
- Peavey
- Swede hook
- Carpenters square
- ScriberChisel set
- Bark spud
- Digging bar
- Log dogs
- Plumb bob
- Calipers
- Chalk line
- 30′ extension ladder
- Construction knife
- Portable generator (if no electricity avail)
- 10″ ‘C’ clamps
- Putty knife
- Mortar board
- Portable concrete mixer (nice to have but not required)
- 1000′ white string
You need to lay out all the logs first.
The best time to peel logs is just after they are cut.
As you are building the walls, measure the corners from time to time. They need to be within 1/2″ of each other.
2. Create a Log Catalog of all your Logs
- For each one, number them and put the following in your catalog:
- Log #Diameter at the large end
- Diameter at the small end
- Length
- Description (ie. very straight, lots of knots, bowed)
- Location (create racks of logs that are numbered)
- If you have a bowed log, put the bow facing out and but all bowed logs in the same wall
- After you catalog your logs, pick the ridge pole. It should be the best log you have.
3. Seasoning the logs
- Cut the logs in the fall after the sap goes down
- Skid to the site with the bark on
- Don’t skid freshly peeled logs
- Store on a couple of sacrificial logs
- Roll them 180 degrees each week for 10 weeks, then once per month thereafter for 10 months
- Seasoning racks should be in the shade
- The pier blocks need to be 18″ above the groundPier blocks are 7 feet on center
- Blocks need to be below ground deep enough to be below the frost line. Talk to local people to determine how deep that is
- Build the pier block forms from 3/4″ exterior plywood. 3′ at the bottom and 8″ at the top. For corner blocks, they need to be 8″ by 24″ so both the butt and the pass logs can rest on it. Only put rebar in the pass log.
- Use batter boards to layout the house. The batter boards need to be about 5′ from where the house will be.
- Build the batter boards out of 2x4s with one end pointed to go into the ground
- Use a hand level to sight the tops of the batter boards to level
- Line the insides of the pier block forms with plastic to help removing them when dry
- Rebar needs to go thru the pier block up to 6″ from the ground. It should not go to the ground.
- On top of the pier block you put felt and then 2×10 treated plates for the logs to sit on.
- Pour extra cement from pier blocks into 18″ square by 10″ deep forms to use for porch blocks. About 3″ of rebar sticking out the top.
- A triple gang sawmill is great for cutting lumber from logs. Usually, the guy will cut for free if you go halves on the lumber that was cut.
4. Five Basic Principals of Construction
- Level
- Plumb
- Square
- Parallel
- Same plane
- Don’t sharpen the rebar used to pin the logs. This would cause the logs to split.
- Only drill the top log when pinning. Use sledge hammer to pound into lower log
- Drive the rebar pins in 12″
- Use log dogs to hold the logs in place before drilling and pinningUse your level on the inside wall as you go up (at the corners)
- At about 5 feet, attach your level to a 2×4 for making sure the whole wall is level
- For any interior lumber (such as roof car decking and window/door frames, stain it before installing
- Rather than having a bedroom in the loft, you can have an “unfinished storage area with a ladder”.
- Make the openings you cut for the window and door frames 1/2″ wider on each side. Use shims when installing
- When the logs shrink, the centers of the logs will remain roughly in the same place and the top/bottom will draw towards the center.
- Check code for side of doors and windows.
Most people get 41′ logs because they can be hauled without a permit. That will allow them to build a 35′ house.
If you enjoyed this post, subscribe to our feed
I am looking for a step by step on how to build my own log cabin from trees I cut down around my farm. I do not know a lot of terminolgy, and this will be my first attempt at such a project. Can you advise a location where i can find detailed publication, possibly with photos or even video?
One of the best resources online is http://www.loghomebuilders.org/ they also offer a weekend workshop that I understand is excellent. I’ll keep my eyes open for video tutorials.
Take a look at http://www.logcabinhub.com/how-to-build-a-log-cabin/
It is a complete blog post on building a log cabin with all of the terminology and pictures.
It helped me tremendously when building my first log home.