
In this post we will discuss some tips for success and ways to finish your tiny log cabin. Steps to success:
- Draw your plans
- Build a scale model
- Make a materials list
- Do a cost analysis based on the materials list
- Redraw the plans to fit your budget
- Cut your logs when they are hardest to peel
- Floor rim joists are lag screwed to the sill log
- Might want to make the pier blocks wide enough to support the rim joists
- Lag screws every 2 feet on rim joists. Use 6″ by 1/2″ lag screws
- Metal joist hangers on 16″ centers
- Nail 1x4s across the joist hangers on the bottom to hold the insulation sheets
- Use polystyrene insulation sheets to R-19 or morePut 7 mil visqueen on top of the insulation sheets IN the cavaties stapled to the sides of the floor joists
- Use construction adhesive under the floor boards. This prevents squeeks.
- Use 2×6 tongue and groove car decking for the floor
- Second story floor joists are 4x10sGet joist hangers fabricated for 4x10sUse hot dipped headless nails to blind nail the car decking in place for the floorRPSL – Ridge pole support log is thru bolted to every other wall log with 1/2″ all threadRPSL sits on the floor for small building but for a larger one, make the center pier blocks big enough to sit the RPSL on them.
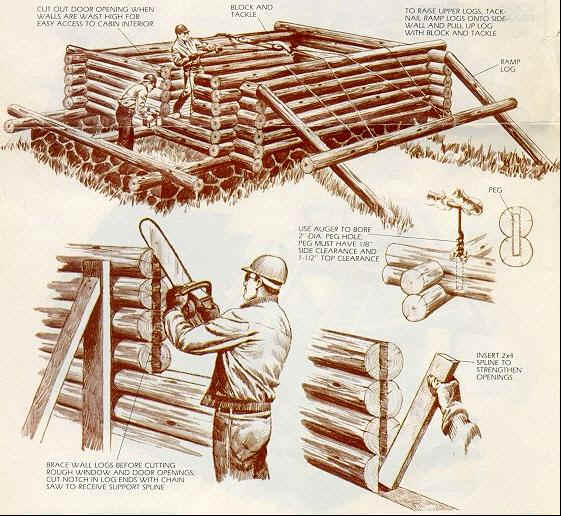
To get the RPSL straight and level, use a tripod 50′ away with a white string and plumb bob. If windy, put the plumb bob in a pail of waterCorner lifting poles. Dig 4 foot deep hole at the corners on the inside and tamp the dirt really tight. These have to be removed later rather than just being cut off. Remove by jacking them out.
- Attach guy lines from the top of the lifting poles to the bottom of an adjacent lifting pole for stability.
- Nail 2/4s to the side of the top of the lifting poles to prevent the chain from slipping down.
- Check with Pacific Iron and Metal in Seattle to get block and tackleGet 3 pulley 6 or 8″ blocks
- When lifting the logs, use nylon straps since they will be easier to get off the log when it is in place
When you submit your plans to the building permit people, ‘by mistake’, attach a copy of your LHBA membership card and a note from ‘someone’ saying that these plans have been used and approved in every county in the state.
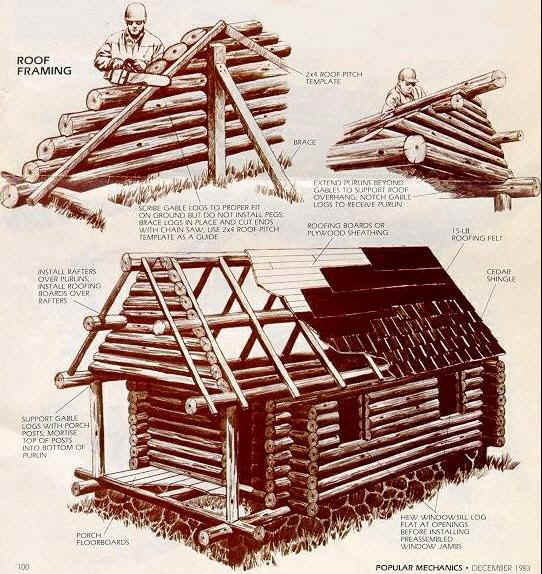
- Use 4x10s for roof rafters. They are thru bolted at the top and spiked into the top wall log at the bottom.
- Put in 4x10s pieces between rafters at the top of the walls for ‘bird blocks’. Spike these into the wall with 2 rebar spikes
- Use ‘C’ clamp to hold two rafters together as you bolt them together.
- Raise all the roof joists at the same place and then side them down after they are bolted together.
- Might want to place a 2×10 from the ground to the top of the wall to create a ramp for the roof joists top ride up as you pull them into place.
When pulling rafters, use a couple of pieces of rebar in 3/4″ holes on the top wall logs to guide them up. Can easily remove to slide the rafters over after bolted.
- Put 2×6 T&G car decking on the roof joists. Tongue up, groove down.
- Don’t use any construction adhesive. If someone is walking on your roof, you want to hear it 🙂
- Nail 2x4s on 2 foot centers to the car decking to create something you can nail the 2x8s to that will create the insulation pockets.
- Use 2x8s on edge nailed to the 2x4s to create a 8″ pocket. These are on 2′ centersMetal roof attaches to the 2x8s. There is not a sheathing before the metal roof. Talk to the metal roof people to get exact instructions on what they really want. It might be different from the above. They might want the 2x8s horizontal rather than vertical Window frames. Build around the window so you get a perfect fit. Then put them on the wall and mark the hole you want to cut with the chainsaw. Remember, 1/2″ on each side and use shims. Windows should be at least 2′ from a wall corner.
For chinking, get 6″ by 1″ sill seal fiberglass bat. Cut into 1″ wide strips. Lightly push into both sides of the crack. Leave an air pocket between the two pieces of fiberglass.Nail hot dipped galv. finishing nails on angle into the crack on the lower log. Bend them up towards the top log. When the logs shrink, the chinking will pull away from the top log. That makes it really easy to touch up the chinking later.
Chinking nails are every 3 inches
Mortar mixture1/2 part lime1 part portland cement3 parts masonary sandAdd water to the consistency of peanut butterCover the top of the mortar board with plastic stapled to the topPush mortar into the cracks from the mortar board with a cake spatula or putty knife
- If you want to use any stain, use the oil based type. However, Skip feels that any sort of preservative is not needed. Only for looks.
- Gabel ends are framed. You can do it with logs however that is harder.
- Gabel ends are constructed as follows (looking from the outside in.Board and batten30 lb felt
- Polystyrene insulation sheets to proper R valuevapor barrier (7 mil plastic)
- Dead air space
- Board and batten
A study at the University of Fairbanks calculated that the R value on a 12″ log is R-48. Wow!If you use logs for the gable ends, nail 2x4s on each side to guide your cut.
This should give you an idea what is involved. Are you up to the task? If so get your plan started and happy building.