Guest Post by Jerry Hambley
In 2004, my wife and I decided to purchase 20 acres in rural Kansas about 45 minutes away from our suburban home in Overland Park, Kansas. With a daughter close to graduating from high school, we thought the best way to transition to the country might be to build a small cottage that would serve as my home office. I sat down and made a list of requirements for the office and decided it might be wise to add a small kitchenette and second floor sleeping loft just in case we wanted to spend the weekends at the farm.

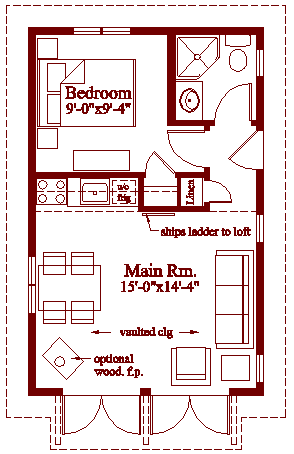
After a good deal of research, I settled on a set of plans called the “Weekend Warrior” by Robinson Residential. Using those plans as a guide, I expanded the footprint of the cottage by three feet and added a full second floor sleeping loft.

Having just built a small pond on the front side of our property, we decided to set the cottage about fifteen feet from its edge. This would provide an excellent view of the wildlife while maximizing passive solar gain as well. The final grade for the cottage would be about three feet higher than the surrounding grade to allow for proper drainage. We then poured a 16ft x 28ft concrete slab as the foundation for our little building.

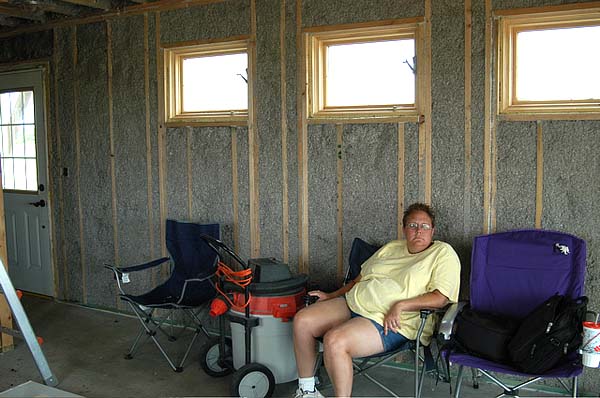
We chose to frame the cottage using 2 x 6 wooden studs as this would allow for additional insulation in the exterior walls. We caulked and sealed the base plates and any exterior openings and then had wet-sprayed cellulose insulation blown into the wall and attic cavities. Cellulose insulation is made from recycled newspaper, cardboard, and cotton which has been treated with boric acid as a fire retardant. The exterior of the cottage was finished using lap siding by SmartSide which is warranted against rot for 25 years.

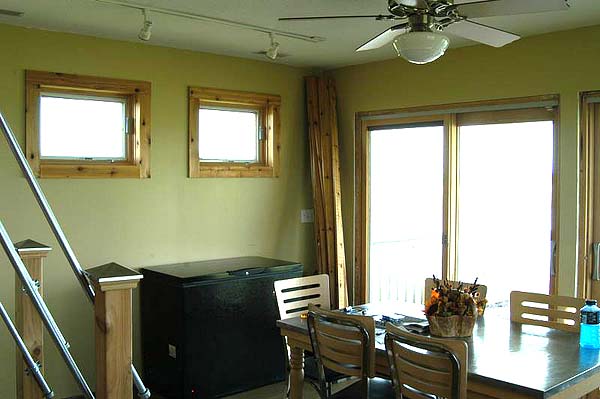
We had been purchasing high quality Pella windows from our local home improvement stores “returned window” section several months before construction started. These were windows that had been custom ordered and for whatever reason either not picked up or were the wrong size. This saved us a huge amount of money and allowed us to have the highest quality windows for a fraction of the normal retail price. To increase energy efficiency, we minimized the glass on the west and north sides of the cottage. Small awning windows set high on the north wall of the cottage allowed for cross ventilation and natural lighting while at the same time conserving valuable interior wall space. The large twin patio doors on the east side of the cottage made for easy access to the covered deck and opened the small footprint to the outdoors.

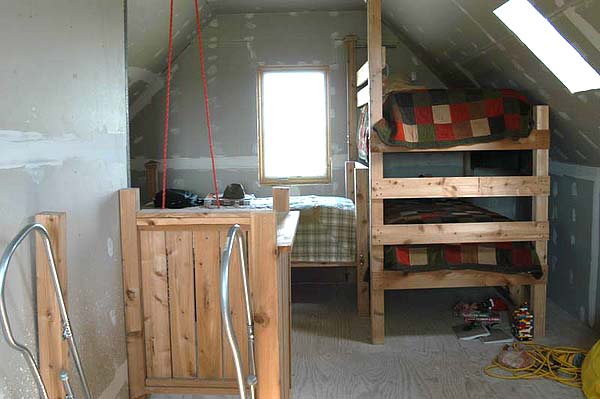
The first floor of the cottage contains the dining area, kitchenette, pantry closest, bathroom, and bedroom. Accessed by a set of ladder stairs, the second floor loft is one large open area with nine foot ceilings. Two skylights help keep the area filled with light and provide excellent summertime ventilation. A small utility closet on the second floor contains the hot water tank and HVAC system.

We chose to keep the interior finish of the cottage very simple. We painted the concrete floor and used cedar boards to trim the windows and doors. The doors are all painted a cinnamon red which adds to the playful nature of the design. We even built a treehouse-like windup bucket that the kids use to haul up snacks and drinks. The kitchenette has a full size sink, and several maple kitchen cabinets. A cabinet mounted microwave, large toaster oven, full size refrigerator and chest freezer, all allow us to easily store and prepare meals. The use of an electric fry pan replaces what dishes would normally be cooked on a stove top. In addition to the small number of kitchen cabinets, a small pantry closet, roll around stainless steel cabinets provide loads of storage.

The bathroom includes a corner style shower with full size pedestal sink and toilet.
The downstairs bedroom measures approximately 12ft x 12ft and has a small closet.

As it turned out, we had to delay building our permanent house, so we decided to move our family of four into the cottage. At approximately 800 square feet, it’s less than 2,000 square feet smaller than our city home, but we were amazed how well it functioned. Since we never intended to live in this little house for extended periods of time, we didn’t include a laundry room. In hindsight, I should have added a small closet that could have been used for a stackable washer/dryer unit. Other than that however, the cottage functions very well and I can’t think of anything else I would change.

People are always shocked when we tell them where we live. Such a small home set on 20 acres does resemble a kid’s playhouse but we assure them we do in fact live quite comfortably in our “Little House on the Prairie”.
Statistics:
Year built: 2006
Land: 20 acres
Construction: Wood framing on concrete slab foundation
Size: 16 ft x 28 ft, approximately 800 square feet of living area including second floor loft
Utilities: All electric (with whole-house backup generator), rural water, septic system
Cost: Owner built for approximately $50,000 not including the land
Resources:
Robinson Residential: http://www.robinsonplans.com
Pella Windows & Doors: http://www.pella.com
SmartSide: http://lpcorp.com
Sherwin Willams: http://www.sherwin-williams.com
Cellulose Insulation: http://en.wikipedia.org/wiki/Cellulose_insulation
Generac Power Systems: http://www.generac.com
Contact Information:
Jerry Hambley
Website: http://www.lemonscorner.com
Email: letters@lemonscorner.com
[nggallery id=42]
Fine, fine job!
Thanks Liz.
We learn a little something each time we do this. This is my third owner-built house. I think I may have one more left in me. I kid my wife that she’ll have to bury me in the backyard of the next one 🙂
Lovely home! You are a gifted craftsman. 🙂
Thank you so much for all your kind words of encouragement!
Jerry
Congratulations from a fellow Kansan! I’m considering doing the same, but since I’m single, I’m considering 400 sq ft or less. (less is becoming more and more exciting!)
Your house is beautiful. Is the concrete cold in winter? I had considered that, but my basement floor in winter is frigid, so I’d almost decided against it.
Did your cost include general contract labor, or did you do all the work yourselves?
Did the cost include running utilities to the property or into the property?
Hi Mary,
I have built several of our homes through the years doing all the work myself except for pouring concrete.
On this cottage, I was pressed for time, so I acted as my own general contractor for the larger items. I did help the electrician pull the wiring and installed the fixtures which saved me some money. In addition, I did all of the interior finish.
As for the concrete floor, you need to insulate and install a vapor barrier under the concrete slab (including the edge of the footings) to help reduce the heat loss.
I didn’t include the cost of purchasing the rural water meter ($5K) or trenching the electrical to the building ($1,200) in the total cost. I did however, included the septic system and lateral lines.
Very nice, great job.
Thanks Bob!
YAY! Fellow Kansan! Great Job! I love Kansas, but since the land is considered agricultural, it costs a fortune. I cannot afford to buy in my homestate and I love Missouri and the Ozarks too and it’s right next door and gorgeous and affordable, so it all works out. But I admit I’m envious of you.
Victoria,
It’s hard to beat the Ozarks for sheer beauty.
I think you might be surprised at the cost of land in east central Kansas. They just auctioned off the place next to me for $1,000 per acre last year. You can’t row crop that land and if you’re a tree lover you’re out of luck. It does however make excellent pasture.
What a great house! I love your dining room chairs–can you tell me where you got them? Thanks!
Mary,
I bought that dining room set about 10 years ago at one of the local furniture stores for about $350.00. It has a stainless steel top which was hard to keep clean so I took my grinder to it and put swirls into the stainless. Looks pretty neat and no more finger prints 🙂
Wow! I know this house! I drive by it almost every single day. I know the people who live here and had always been curious about the layout inside. So glad to see it make the Tiny House Blog!
Howdy neighbor! Funny, we’ve had a lot of people say they would love to see the inside of our little house 🙂
Great job- what a nice looking homestead! I totally get the laundry issue. I’m hoping to eventually get a small Montana Mobile Cabin and a basic garage/shed for the bikes and camping gear. I plan to attach them with a short tunnel that acts like a mudroom/laundry area.
GMH,
We will definitely have a mud room in the next house 🙂 Good luck with your building adventure!
Jerry
Hi Mary,
Nice job amd I like the size too. It’s not too large and a lot more livable. The stairs look more nogitiable than many others I have seen too.
I think we need more low cost homes in that size range. It’s a real home!
Walt
Thanks for your comment Walt. I do think it’s a very livable size.
Jerry
You did a great job! What an awesome house! And kudos to you for putting in so much insulation; I spent my teenage years in Pittsburg and I well remember those winters!
Rebecca,
It can get both bitterly cold and pretty hot here in east central Kansas. The additional depth of the wall framing and extra attention to weatherproofing the house has made a huge difference in both the level of comfort and our utility bills.
Thanks again for your kind words.
Jerry
Oh, I well remember. Freeze in the winter, bake in the summer.
Once again, you did a wonderful job on the house. We’re starting ours soon and I can’t wait!
Absolutely wonderful! Does the 50,000 include any labor costs? I am considering building a small house for my family.
Abel Zyl in Olympia
Abel,
Yes, we did hire local craftsmen for everything except the interior finish which we did ourselves.
Jerry
So cute! Thanks for all the details and pics! Great descriptions!
Very informative post, thank you.
Congratulations on you new home.
Love the house, but no basement in Kansas? Do you have a tornado safe place to go to?
airstreamingypsy,
Since this cottage was not originally designed as our home, we didn’t build it over a basement. The neighbor has made his storm shelter available to us in case of extreme weather. We plan to build a full basement in our final home.
I too designed & hand built an 800 (20′ & 24′)sq ft home back in 1982=2004. A Cape with a full south facing dormer, 24’side(so a Saltbox really). 800 to 1000 sq ft is VERY much livable for a family of around 4. I had both bedrooms upstairs with a full set of stairs up, & So with having a larger kitchen area, I was able to solve the washer problem by tucking a small front loading washer under the kitchen counter, & I line dried.
At 58, I too hope to have one more house “in ME”. It is Designed to “Age In Place”.
Under-Counter Washers are std. throughout the European Houses we’ve rented for ~1 week stays. Also, LG – amongst others – makes a W/D Combo in one ‘Box’. It dries Electrically on 120 VAC and takes longer, but gets the job done. Being S. Korean, LG builds for their Home Market where there’s massive Apt. Blocks that have no outside Dryer Vent possible. So, they build in a Water ‘catch’ Trap, and engineer in other neat features. I used a Sears W/D Combo Decades ago, and it was really slick.
A person could also build in a couple of Storage Shelves, and still have room above the W/D, if it’s not under a Counter, for a Demand WH, or other House ‘Infrastructure’.
Superb job on the House above. Excellent!
Interesting comments. I’ve heard the 120V electrical dryers take forever to dry clothes. A clothes line is great in the summer but it gets cold here in Kansas.
I had also heard that the non-vented dryers were troublesome. I’ll have to do some more research in this area. Thanks for your comments!
Were you concerned about building so close to whatever water the photos show? A river, creek, or? And your house isn’t on piers?
Good question Nancy.
Actually the water you see is the edge of a small pond we built. The photo does make it appear closer than it actually is and we built a spill way into the pond to prevent the water level from getting any higher. The cottage sits on a graded pad over four feet higher than the pond level. Its footings extended over three feet below grade (below the frost line).
We DID NOT treat the soil below and around the foundation with chemicals to prevent termites (which is common in this area) as we were concerned that those chemicals could seep into the pond.
I love the staircase it looks strong with an arts and crafts style. Can you tell me the make? Not something we use much in Ontario Canada. Thanks.
Jan
Jan,
I actually hand built the stairs. The are made of typical pine stringers and stair treads. Instead of cutting in each stair I used metal brackets to support each step. The post are 4 x 4 cedar with tin post caps from the deck section of Home Depot. I made the rails out of standard metal electrical conduit and bent it with a conduit pipe bender.
I weigh 270 pounds, so the stairs are Jerry tested, Jerry approved 🙂
No wonder they look like a piece of art. You are a real craftsman.
Jan
Very nice!
Thanks Paul!
I love the house! If it was for me and my husband I would put the kitchen where the downstairs bedroom is and just having the loft as a sleeping area. 🙂
Hi, just thinking about moving out west and building something small and simple. Any advice on how to approach the first steps on building?
Many thanks.
hi I love your house it’s almost exactly like mine except mines one story my question is my kitchen is set up exactly like yours is with the living room being oriented to where the picture taker would have been standing in it I can never make this room work it never flows or looks right any suggestions?
How do you find the temperature of the cottage in the winter and summer? Does it help keep the cool or warm air out? Great choice to go with an eco-friendly insulation for the cottage.
I really like being economical with most things I do. I don’t find as much pleasure in splurging as I do in the “sport” of challenging myself into giving away as little of my hard earned money as I can. I love small homes. You clearly know much more about the subject than I do. I have always thought that additional square footage by loft like you did or upper floor on small footprint would increase space with small impact on building cost and virtually no increase on cost of living. Would you agree with this?
I LOVE this layout and plan. Wish there were more angles to show the openness from the front door back toward the kitchen. Looking to build a very similar one on our property here in Georgia soon.
I like how you kept the layout simple and open! It is the perfect cottage home on a large plot of land. I hope to be able to build one of these one day. I think, for me, I will try and keep it all on one level so it is more accessible as I get older. But I like what you have done! Super cool.
A story very inspiring. I wonder how is the weather in “Overland Park” and how are you prepared to weather events. The cost of $ 50,000 is an amazing value. Can you share new pictures, Thank you.
I know this post is a few years old, but I just stumbled across it. Your home is beautiful. My husband and I have family in Topeka and KC, so we’re considering retiring there. We have been looking at land online and the prices are outrageous! How did you find such a nice parcel?