by Katie Probert
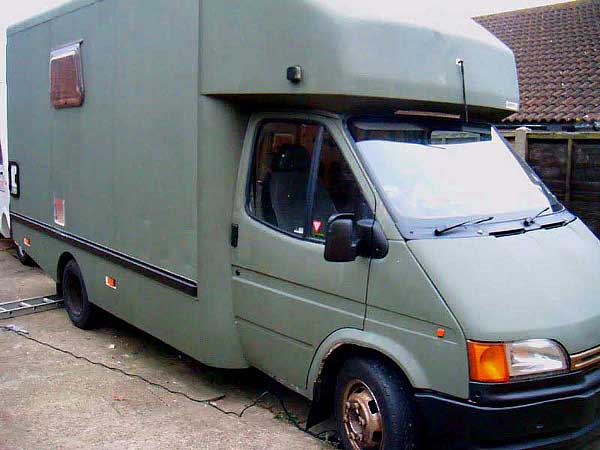
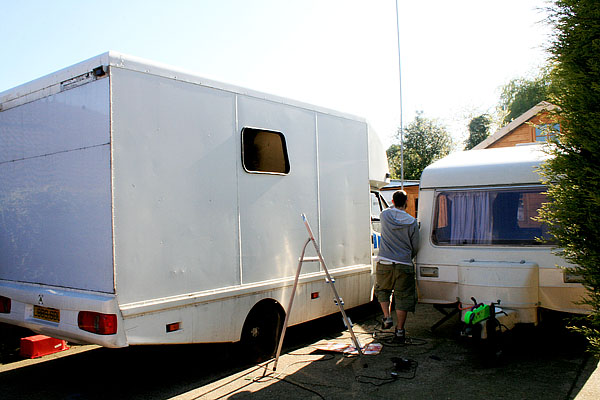
As a solution to the expensive accommodation in the Alps, my boyfriend Toby and I bought a knackered old Ford Transit on ebay for £900, to convert into a home on wheels. Our plans were to quickly convert it into a cosy shelter, with a bed, basic kitchen facilities and lots of insulation. We estimated two weeks’ work. In our excitement we didn’t realise that the engine was shot…until we got the thing home and it was too late. We checked her into the garage for a brand new engine. We didn’t get her back until seven weeks later.
Whilst we waited for our van to come back from the garage, we started sketching out possible layouts and trying to find out as much information about van conversions as possible. This was before we knew about the tiny house movement, or any of the DIY blogs that I read now. I had zero building experience, and neither of us had ever attempted such a project before. Armed with our new bible, the Haynes Motorcaravan Manual, we embarked on an adventure of trial and error, that would end up taking us 18 months to complete.
Our Little Trash Home
Most of the wood we used for our worktops was found discarded in skips. We bought a second hand caravan and gutted it for parts – windows, doors, lights, heater, sink. Not only was this free, but it gave a second life to other people’s rubbish. We bought and sold at car boot sales and on ebay, to upgrade parts.
Design and Function
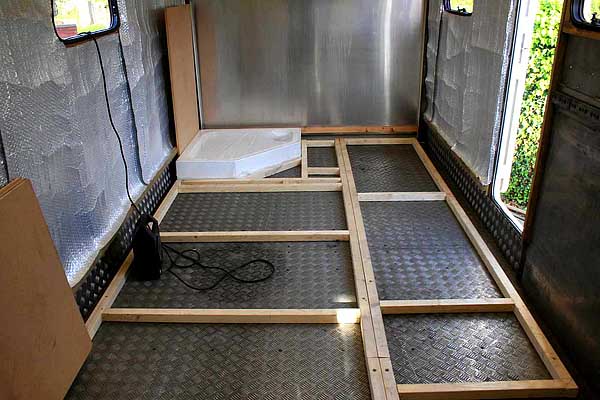
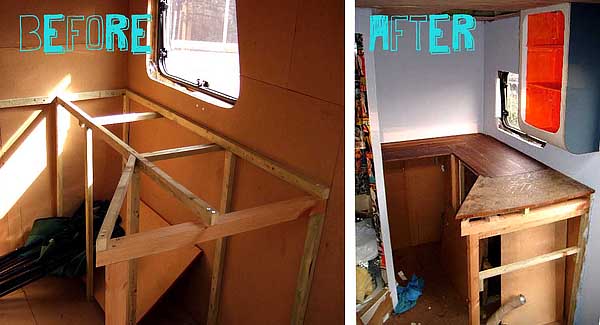
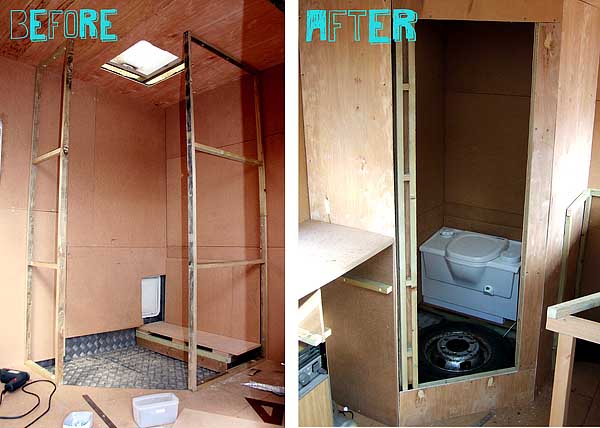
We got ambitious with our design and building skills. We steam bent wood to make curvy cupboards. We tore out pages from a London A-Z to create a worktop with a map of where we had been living. We even pasted pin up girls all over the bathroom, for a cheeky surprise! The walls, floors and ceiling were triple insulated with bubble wrap insulation and rock wool. We plumbed the kitchen and bathroom to have water from the 300 litre tank, in case we couldn’t connect to a water supply. We connected up an army of seven leisure batteries, for if there was no electric hook-up. We figured out electrics so that the living space was lit with LED lighting, and we threw in a water heater for good measure! Our aim was to ensure self-sufficiency for Alpine conditions.
Van Life
Everybody thought we were mad, both to embark on such a project and to live in our van in the mountains throughout the winter, but I’ll tell you what – it is my absolute dream home! We built it ourselves, and what’s more, there are other like-minded people out there. We are the lucky few who get to live in an amazing community of van-dwelling friends in DIY homes, on the top of an Alp!
And yes – we are toasty warm!
For our full van-building story, go here: http://jesuisunemonstre.blogspot.com.au/


Very cool. I’m afraid to ask what the mpgs are…
Hi Mike,
If mpgs means miles per gallon, then I think it does around 25. I don’t mind that it doesn’t do the same as a tiny little car, because it’s not a tiny little car! 😛 I find it quite acceptable consumption and cost for being able to drive my entire house around – slowly and carried on my back – like a snail! 🙂
I always wonder why no one ever mentions worm toilets as I think they would be a great idea. The castings could be sold, given away or used for your garden. Did you consider one? I love your van. I am looking at a messed up one for 1600 asking that intrigues me.
Thank you for sharing your lovely little home and the JeSuisUneMonstre blog with your Pikey Park adventures. I really enjoyed reading about all of it. Great lives come from many little actions!
Thank you Elisabeth! And thank you for reading my words on my blog about Pikey Park adventures. You’re too right about all those little actions – they lead to more little actions that lead to many great things! X
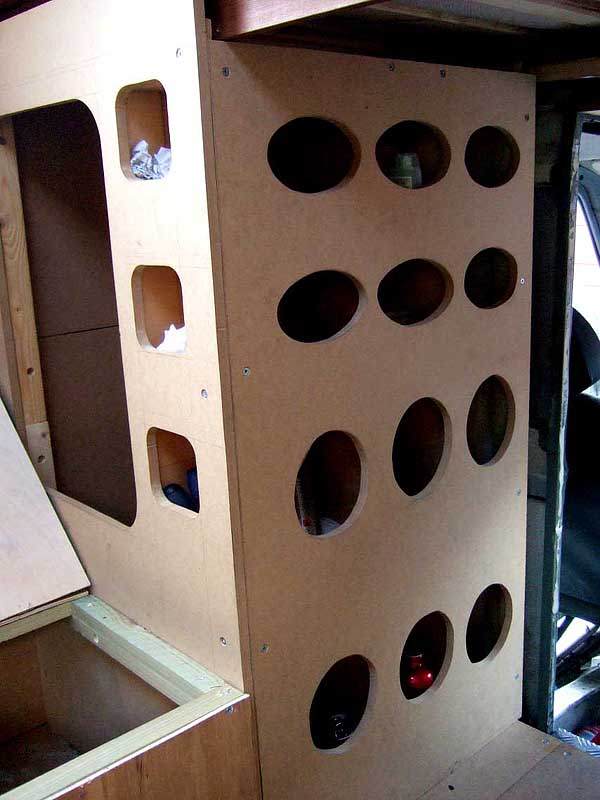
Nice job. Those storage cubbies are great!
~Admire your vision, and perserverance in achieving your goal! You made it happen…BRAVO to you!!
Thank you so much for your kind words Donna 🙂 We are pleased as punch! X
Wow! You might round that razor-sharp corner on the counter. I have a dear friend that loves chickens. Those circles, ovals would make great nest boxes. My friend could travel with her birds. Great idea.
This is just great. How clever you have been, and now with such a spectacular place to live, you are set for years of adventures. Thanks for sharing.
Cheers Kathy G, glad you enjoyed it. It’s my own tiny little palace, and I love it to pieces! X
I have done a few cube type vans and this is a pretty typical layout, they more or less dictate what you can do but I learned long ago not to put things like the spare tire in a location like this one is in. If you can’t access it from the outside, then mount it on a front or rear bumper. I remove them from the undercarriage whenever possible. A spot under one of the bench seats accessible from the outside is the best bet and I have my jacks and any other tools designated only to change a tire there along with a plastic bin which I have coveralls, knee pads, gloves and breakdown reflectors. Taking a clean tire out is one thing and you can do damage to your interior very easily with a tire of any size, then putting in the dirty or blown one in then back out for repair and then back in you will regret placing it there. Sounds like a non issue, just wait.
I get out clean, change the tire, get back in relatively clean and wash up and am off again with no regrets and isn’t it amazing how you only get a flat in the rain, in an area where it is difficult to find room to pull over or some other place where it is difficult to change! It’s a Murphy law dontca know. Heaven forbid the tire goes flat in a paved lay by; you are truly blessed when that happens.
Here is a little hint, buy one of those plastic snow slides the kid’s use, the one that rolls up and rolls out flat to about 3.5 or 4’long. When you have the vehicle jacked up (and if you are smart, you will have practiced changing the tire on every new to you vehicle, have 2×10 boards cut to put under your jack and wheel chocks) slide the snow slide under the tires and it is easier to pull the tire off and pull it out of the way. This thing also works well as a drop sheet if you have to lay under the vehicle (never jacked up or on a stand) for some unforeseen reason. I also carry a jack stand that I place under the axle before taking the tire off, (caution, have a stick apparatus to place and remove the stand so you don’t even have to reach under the vehicle to place the stand, I use an extension pole). Now, with that said, I keep very good tires to include the spare on my vehicles and have a cell phone to call AMA. Love AMA…
I have another cube with an 18’ box and time allowing may just do it up but this time, I purchased one with swinging doors so will sacrifice at least 16” of the rear as a tool crypt or storage for other things like a small generator, extra safety (life jackets, blab la bla) and camping equipment. You can fit a lot in that space if it’s organized.
While I am on the organize kick, I do not use one tool box, I am anal about having to make on road repairs, when I install a furnace, I install to be easily accessible for repairs and have a little box with all the tools in it to make any repairs just to the furnace, as I do with the fridge, hot water heater, stove or whatever else your heart desires. I also have shut off valves and bypass systems on everything, water lines, and gas lines and yes my batteries. I build everything in for summer and winter use to include holding tanks; with the advent of heaters like the little buddy I carry two of those.
I travel in vehicles extensively and have with disabled people, so want to always ensure their warmth. The shut off and bypass systems ensures me I may be able to make necessary repairs on my time without having to shut down other systems. Each tool box is clearly marked, I have a lot of ½ and 9/16ths wrenches but I don’t rob Peter to pay Paul. The one single most important thing is a master shut off to the water pump (no one dose this, except me), if a leak starts and the pump starts, a small problem becomes huge.
Now, for anyone who may say, well, he is just stone stupid. If you have read my comments before and haven’t figured that one out then you are a little slow on the uptake and we just may have a bit in common. I have had to make many on road repairs and not in vehicles I have built, but in factory built vehicles. I have been stopped for days at a time because of forest fires, accidents and snow or rock slides. I have the time to write this gibberish today because a planned trip to Slocan BC this morning is cancelled because a tanker full of jet fuel rolled over and is blocking passage at the Junction of HW 6 and HW 3a to three km N of Lemon Creek to my destination (they are evacuating the area and fighting forest fires as well) a once in a lifetime event, LOL, the last time this happened to me was in Baxter CA many years ago and God bless the owners of the little hotel restaurant there for taking good care of us for 3 or 4 days, would you believe they cut their meal prices in half to the truckers shut in because they wouldn’t take advantage of a bad situation we were forced into. (I hope they are still in business, they deserve success) will this happen again, who knows, except for caring about the truckers and the people whose lives are disrupted by it, I won’t suffer, I am ready for anything and it’s just part and partial to travelling and gaining a new experience. (You didn’t really read this to the end did you?) Have a nice day.
Thanks Ralph, you guidance and experience is well received.
Hi Ralph…thanks for your interest.
Just wanted to clarify, the spare tyre in the picture was placed there for convenience as we built the van…when we fitted the shower tray it ended up in its original holder underneath the chassis. The holder wasn’t in great condition when the van was bought and we needed to repair the bracket before we travelled anywhere with the spare tyre slung underneath. The area underneath the bench seats we used for storage on one side, and a 300 litre water tank on the other, we have now removed the tank as the site we reside on has hot and cold running water.
We did run into trouble on our first trip in the van, a broken concrete kerb at a French supermarket tore a fist sized hole in one of the rear tyres. We have dual wheels on both sides of the rear axle, (due to the van being rated at 7500kg gros weight) this enabled us to travel somewhere convenient to repair the tyre. This was a consideration when buying this specific model, the double tyre system came in very handy, and thankfully we have managed to avoid broken kerbs since.
Because the chassis is quite high off the ground we bought a high lifting bottle jack, and made a underfloor box to keep it and wheel removal equipment in. Space is an issue when building a van, as you well know, and having a dedicated space for important equipment is a must.
We too included shut off valves/switches for gas, water and electricity. In fact we installed two internal water heaters (a Morco instant heating system and an older Carver Cascade 2 storage heater as a backup), with bypass and re-routing systems for both so that we could repair one without going without hot water. This was a necessity for us as we planned to live at 1700m above sea level in constant minus conditions.
We installed several shut off valves for the water system (including one before the water pump) so that we could remove any part for repair without having to drain our water tank. Since we removed the water tank we have left all pipes in situ and can easily connect the whole system together if our situation changes.
The term ‘belt and braces’ applies to the way we approached this project. Our battery system has three charging systems, a direct mains power input passing through a multiple breaker fuse box. This connects to our fridge, mains sockets, 12v consumer unit, main 20amp charger, and a backup 4amp charger. The third charging system is a Sterling Alternator to Battery charger and is fitted with voltage and heat sensors to the alternator and leisure battery banks. This device enables a very fast and efficient charge whilst the vehicle is running. It keeps all of our batteries in good condition as it runs a three phase charge specifically designed to maximize battery life. Our van has two batteries in the engine bay, one starter battery and one is a backup 75ah leisure battery in case an issue arises with the main 450ah bank located in a large battery box built into the van.
Gas is run from an auto changing dual bottle propane/butane system. This ensures we never have to leave the vehicle on a cold night to change bottles. Every gas appliance in the van (fridge, both water heaters, grill, cooker and space heater) has its own shut off valve, again allowing us to repair a specific appliance without having to shut off the whole gas system.
We are looking forward to another winter in the van, we’ll be living in it from this September until next May…fingers crossed for lots of snow!
Best,
Toby
Ralph I did read it to the end. I tend toward lengthy posts myself. Great to have your input. Thank you.
I hate you..the van looks awful and I would never step foot inside!!
OK..I am lying!!!
So green with envy I am ashamed of myself…I have a great life that most would love. Yet, I would have loved to do what you did!!! If anyone gets anything out of your wonderful venture, let it be; just do it!!!
Kisses and keep going!
Carrie
Thank you Carrie for your sweet words! Have you got yourself a van yet for some sweet adventures? 🙂 X
Hi! I’m Sara. Wow! Awesome work on your conversion! Very cool for very brave people! That was very smart in purshasing the cara van to use as parts. And, then get money back on the exras! Very smart move I say so myself! Thanks for sharing it gives a lot of ideas making it easy to sart my own van coversion. Helping my fears to ease up.Thank you both for that. Keep on enjoying your tiny home!
Thanks Sara!
It makes me very happy that by sharing this it inspires some confidence in you to do something similar, or to make your own dreams come true. All that was an adventure in itself!
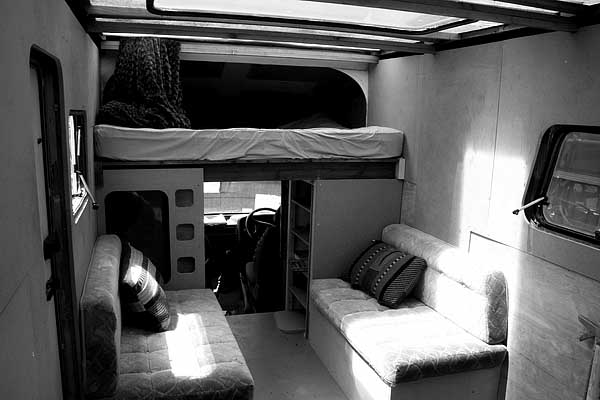
I want to share some shots of the interior as it’s finished, particularly now a year after writing this article, we’ve done a few ‘home improvements’ and she is super practical for living in now.
You can follow my adventures at my blog: http://www.jesuisunemonstre.blogspot.com
Look forward to hearing about your own conversion adventures 🙂
Katie. X
Katie, love the article. Would love to follow your blog but am unable to unless invited. Could you please invite me?
Many thanks,
Jeannie
P.S. Would love to see pics of the finish project. Thnx!
Not enough windows for my taste. needs a couple more that’s a little bigger.
Quite a nice solution. But – too bad they permanently included all that black mold growing on the wood studs and used the type of sheet materials that will likely off-gas all sorts of nasty toxins over the life of the conversion.
It would be nice if this blog site could make a point of warning the average-Joe tiny house builder about all of the bad stuff that is included in so many non-green manufactured products.
Tiny House concepts are small, so the build-up of toxins in the space is so much more concentrated than in a larger space.
Lets not do things that inadvertantly harm the advocates of the Tiny House Movement!
Hey High View,
Don’t worry, it’s not mold, it’s just dirt and pen where I’d been scribbling! Thanks for your concerns though.
I too would be interested in learning about green products for building materials, particularly if I do more building work in the future. When we built this van we didn’t know of any other people that did the same, nor sites that held communities. We were just doing it as a solution to achieve our desired lifestyle in the mountains. We had a small budget and little experience, and just figured it all out as we went along.
We had the opportunity to share the project on here about 5 years after we’d completed it. We have never intended to do anything to harm the Tiny House Movement! In fact, we never even intended to contribute to the Tiny House Movement, because at the time we had never heard of it. I don’t know whether we have contributed anything or not, but seems from the friendly comments that lots of people are interested in building their own little palace and allowing themselves the freedom to move and to change their lifestyles too. And that makes me happy to be able to share our story for that.
As for green – we may not have used ‘green materials’ – but we did do an awful lot of skip digging and recycling, which saved a lot of landfill, and I count that as not so bad.
Anyway, glad you found the solution agreeable. We absolutely love living it in, and I couldn’t be happier with how we’ve done it, and the ‘home improvements’ we’ve added since writing this post.
Would love to see some of your projects if you have any. Regards, Katie.
Hi Kent.
The links don’t work on this page as you seem to have missed “blogspot’ in the address as in:
http://jesuisunemonstre.blogspot.com.au/
Hi Brian, I’ll change them as this is what was sent to me originally.
hi, is it still possible to read your detailed blog? i followed the link but it said for invited users only…thanks.