A Plan For the Micro Home and Micro Apartment Industry

by Kent Griswold on April 19th, 2011. 38 Comments

Following is a letter written by Walt Barrett to the Mayor of Providence, RI. Walt would like to encourage you to pass the letter on to the mayor of your town or city and try to make some changes across the country.

Guest Post by Walt Barrett

Dear Mr. Mayor,

This is a very flexible framework of an idea to help the cities and the citizens. There is a growing movement in the world today towards building and living in smaller homes which are often referred to as micro homes, or micro apartments. The idea being that smaller homes are less expensive to build, to heat, and to cool. Smaller homes also require less space which is an ideal situation for any crowded city with a housing problem. Micro homes are very green in design and take a lot less material and labor which keeps the prices down and enables people who may never have had the opportunity to purchase their own home or to rent a decent home to do so.

Now if you consider that most cities need tax revenue, and that we have such a high rate of unemployment, I think that my suggestion has merit and everyone concerned should give it careful thought.

Basically, I am suggesting that the cities and towns that are experiencing revenue and housing problems amend their zoning laws and building codes to allow the judicious building of these micro homes and micro apartments. For example, if there is a home located on a decent size lot, and the home owner wishes to invest in a rental unit to be placed in the rear of the building, and if there is room for a proper parking space etc. then he, or she should be allowed to file for a permit. Let’s take a large three family dwelling that needs rehabbing for example. The investor who buys it should be able to either gut it, or tear it down, and turn the property into perhaps as many as twelve micro apartments. This part of my plan is not rocket science and should be doable with some minor zoning changes.

Now, the second part of my plan is that through building an experimental model, our company has realized that these smaller homes (128 sq ft to 800 sq ft) are highly mass producible and simple to build either in kit form or in certain sizes fully assembled and delivered to the site. It is also noteworthy that many people are powering these homes either fully, or partially off the power grid with solar and small wind power. We find this inexpensive if you stick mostly to lighting systems and hot water. One hundred percent off the power grid is still pricey, but partial systems save money and have the added incentive of tax credits in some areas.

Here is where we create the jobs. I suggest that in a city, like Providence RI, where there appear to be many abandoned factories and other buildings, that they take one of those buildings in a partnership with private industry and set up an assembly plant to produce these homes and prefabbed apartment walls sections etc. A precondition of such an agreement could be that the workers would be hired and trained only if they were residents of the city of Providence only if it is legal. A program like this would add additional tax revenue to the city, and it would also provide some decent jobs. Also, all building materials would be purchased locally as part of the agreement. The cost of the homes should be limited to approximately one hundred dollars a square foot or adjusted as necessary to local conditions. Another idea is to have local businesses that benefit from the program contribute to the program either financially or by providing free training.

My personal philosophy in business is that there does not always have to be a huge profit in every business deal. There are times when we all have to give something back. I pray that idea has not died in this new day and age. When I was a young man everyone pitched in and pulled together to solve the problems in the cities and towns. We can still fix things if we all pull together. I can tell you this. If we don’t fix things soon, we are going down. This is a serious problem.

This is the spine of my idea, and basically it is pretty simple idea and can be tested on a small scale. I’m sure that there are some rough edges that need to be trimmed, but like I said, “It isn’t rocket science,” and sooner, or later is is going to have to be done anyway. Why not take the lead in the race to the future of our cities.

Our Governor has recently, publicly asked Rhode Island business people for their suggestions to help make up for the huge deficit in our budget. This is one of my suggestions, which I think is better suited for the city of Providence than for the State of RI. I believe it needs to be executed primarily by the private sector and the states role should be to strictly enforce the building codes, rules, and regulations, and benefit from the fees, permits, and taxes. We realize our cities need money to operate.

Respectfully yours,
Walt Barrett, President
A to Z Global Marketing Inc.

Note: Permission to reprint is granted. Please give credit to this blog site. © 2011 Walt Barrett

Photo Courtesy Katz Architecture

Posted April 19th, 2011 by Kent Griswold and filed in Tiny House Articles
Tags: , ,
38 Comments

Walt’s Micro Home Plans

by Kent Griswold on December 7th, 2010. 5 Comments

Walt Barrett, who has designed and built a micro home and also guests posts here on the Tiny House Blog has recently made available his Micro Home plans and is letting me sell them to you on the Tiny House Blog.

The plans are for a micro home that is 8 foot by 16 foot and fits on a standard 16 foot trailer. It also has the option of being removed from the trailer and put on a standard foundation. The plans are detailed 33 pages including cut sheets and drafted by Chuck White.

Below are a few example pages from his plans. He has made them available at a very reasonable price of $19.95. You can purchase them below or on the Plans Page.

Walt’s 8 x 16 Micro Home Plans
$19.95


Posted December 7th, 2010 by Kent Griswold and filed in Announcement
Tags: , , ,
5 Comments

Locating Your Micro Home

by Kent Griswold on November 21st, 2010. 40 Comments

Guest Post by Walt Barrett

We need to tackle this land, and location problem head on because next to raising the money for the building materials it seems to be the most difficult problem based upon the feedback that I am getting. There are two separate paths to choose from here, and then some sub paths. Are you working, or are you retired? If you are working and fully intend to stay in your current area you have a different path to follow as opposed to a retired person. You have to locate within a reasonable distance from your work. You also have to meet the codes. The land that you like has to be affordable. The property taxes have to be reasonable, and you have to meet the minimum housing standard size for a residence. I believe that it is imperative in the long run to follow the rules of the town, or county right to the letter, believe me, do not try to get cute with the building officials because it is going to come back and bite you really hard in the long run. The building officials can make you move, or even tear down a building for flagrant violations to the building codes.

Let’s take the retired people first. Most retired people have the option to relocate unless they are penniless. Let’s assume you are not penniless but have limited funds. You could move to one of the states, or to a place like Costa Rica that does not place so many restrictions on home size. Maine for instance, has many unorganized areas the are only interested in having a proper septic system, and will even accept composting toilets as long as the waste is properly disposed of. Whether you take this route, or not depends upon things like leaving the rest of the family behind, and the lack of the family support system etc. I’m sure you follow my drift. Admittedly though, most retired folks have the easiest path when it comes to retiring in a micro home. One more thing for the old timers like me. You can always go on Craigslist.org, and purchase a medium size older camping trailer for as low as $1000.00 and refurbish it. I see them all the time when filming in the Everglades. They move from camp ground to camp ground. I’m thinking about it seriously myself.

Next we have the working people that are stuck in one place for a given number of years due to employment considerations. This can be a problem because finding a place where you can get a permit to build could be over one hundred miles away. The commute can be dangerous, and expensive.

Sometimes, however, you can get lucky by doing relentless searches for property. For example, In 1981 our son Dave found a job first in New Hampshire, and started off by renting a small apartment there. Eventually after a great deal of searching he found a small cabin on a lake within a couple of miles from his job. It was dirt cheap. He can easily walk to work, and is very happy there. The savings allow him to have a like new car and a like new Harley. None of us every buy brand new vehicles. It’s a huge waste of money. If you keep looking hard enough you can find a reasonable place because things are always changing. People retire, or they die, or are forced to move away. I have seen this a great deal in Florida. There are lots of old retired people, and unfortunately, many of them die, or are forced to move in with their children, or a retirement home every day. There are many small homes for sale, and every day the Good Will stores have loads of practically new furniture and household goods coming in. A lot of the furniture is in practically new condition. Many smart people with money patronize these stores, believe me! So that’s a good way to furnish your micro home. There are no set rules for changing your life, or life style. It’s whatever works for you.

I have found many great pieces of land by using www.realtor.com. You can lock in a description of what you are looking to purchase in a given area, and they will email you weekly with properties for sale that will fit the description right down to the price desired. So basically, as I see it. The biggest obstacle to owning a smaller home, preferably in the country, is for many of us, finding decent employment. By the way, my advice to anyone that lives in the north east that is not super rich is to get the hell out while you still can. There is no future here, especially in Rhode Island.

There is another route to explore no matter where you live. The micro apartment route can actually put extra money in your pocket. Although it involves working closely with the building and zoning officials to get started, It is a good route to follow if you do not mind living in an urban area. I have been considering it myself as an investment. I’m speaking of the micro apartment concept. Our area is loaded with abandoned homes and many of them are already multi-family which means no rezoning is required. If you are considering this method you first must have a discussion with the building and zoning people to be sure not to buy a home that is not eligible for micro apartments. Here’s a thought. You may already own a home that is now too large for you now so why not investigate converting it to micro apartments. The one thing I strongly advise is you look into the section 8 housing requirements first because if your apartments are eligible for section 8 the government will guarantee that your rent is paid and also that any damages caused by the tenant are covered too.

Well I don’t know what else I can say right now on the subject, but I’m sure someone will read this and offer some additional ideas. I certainly hope so.

Thanks for reading
Walt

Posted November 21st, 2010 by Kent Griswold and filed in Tiny House Articles
Tags: , , ,
40 Comments

Maintaining Solar And Other Storage Batteries

by Kent Griswold on November 16th, 2010. 2 Comments

Guest Post by Walt Barrett

A few weeks ago I was visiting a US Coast Guard Station where I looked at small solar battery charging installation. It was built to government specifications, and was an excellent example of a perfect solar installation. One of the companies that I have owned for over twenty-five years is a battery company so naturally I was interested in their battery bank.

I noticed immediately that there was a very prominent sign above it that said “Check batteries for water level every thirty days.” There was also a log there so the persons responsible would have to date the log and initial it. I cannot tell you how good it made me feel to see that our government is using serviceable batteries that you can easily water. I really do not like sealed batteries because as a battery re-conditioner I have personally found that when I autopsy a failed sealed battery it is always out of water, or nearly out of water. Now you don’t have to be young Thomas Edison to figure out very quickly that if someone could have added water on time they would not be experiencing premature battery failure.

We get hundreds of letters regarding this subject yearly. Now I am not telling you what to do, but personally, I will not buy any type of automotive or solar deep draw battery that is sealed. No battery is ever really sealed, or it would blow up. They are valve regulated which means when they are charging gases including water can escape. I rest my case on that subject. No watch me catch a lot of flack from “Experts”. Just give me a break and put screw caps on the batteries so we don’t have to drill them to service them.

Now that I have covered that subject we can move on to servicing the batteries. When I was a flight engineer during the Korean War the Air force sent me to an extensive training class on the proper servicing and maintenance of lead acid batteries. I can’t thank them enough to this day! This is the sequence that I do to this day

  1. A visual inspection of the overall condition of the battery. I’m looking for leaks, corrosion, broken, or bad connectors, loose hold downs, and anything that looks abnormal. If the battery is really corroded, I carefully clean it off with a quarter of a cup of baking soda dissolved in a Quart of water. Make sure the caps are on and never get baking soda indie the battery. BE SURE TO WEAR EYE PROTECTION, AND NEVER SMOKE OR MAKE ANY KIND OF SPARKS AROUND A BATTERY BECAUSE THERE IS HYDROGEN GAS PRESENT AND IT IS VERY EXPLOSIVE! This brings up a major point. When removing a battery you obviously have to disconnect it. Always remove the negative – cable off first and put it on last when replacing the battery or the resulting sparks may cause a hydrogen explosion.
  2. Once you have inspected and cleaned the corrosion off the batteries you should use an inexpensive battery terminal cleaning brush, remove the negative terminal first and clean the terminal post and the cable end. Leave the negative cable off, then remove the positive cable and clean and inspect the positive + post and cable end. Did you know that many supposedly “Dead” batteries are only suffering from dirty or loose terminals? Many can be cleaned up, tightened up and recharged. I get about eleven years from a battery. This is a good time to do a battery load test. Please watch the video to view all the tests you are about to read.
  3. While you have the terminals off is a good time to remove the caps and check the water (electrolyte) level. I like to use distilled water. Some people would argue with me, but that is up to them. I do not want a lot of minerals and such in my battery.
  4. Never overfill a battery. An eighth of an inch above the lead plates is sufficient.
  5. Now this is where I get a little more in depth with my battery checking. While the caps are off I always do a hydrometer check on the condition of each cell. Be sure to read the instructions that come with the hydrometer so you will get an accurate reading. There are six cells in a 12 volt battery. I am including a video with this article to show you how to do these simple tests. If you really care about the life of your batteries, you will do these tests. A hydrometer is used to check the condition of the electrolyte in each individual cell. Hydrometer looks like a gravy sucker with a glass float inside with color coded markers and numbers printed on the glass float. When you suck up the electrolyte into the glass tube and hold it level the fluid rises up in the tube. If the level on the float is well up in the green that cell is in good shape. What you have just done is to check the specific gravity of the electrolyte in that cell. Repeat the process for all six cells. If you get significantly lower reading below the green marker then that cell has a problem. At that point we would use an additive and try to bring it up. If a cell has dirty black or brown electrolyte is is usually no good or will fail soon.
  6. While you have the cell caps off you can also do a cell voltage test. You need an inexpensive $3.00 volt meter from Harbor freight or one of the other discount too supplier. Put alligator clips on the ends and cut two six inch test probes from a wire coat hanger. Then clip the probes into the alligator clips. Then, starting with the positive post touch positive probe to the positive battery post and stick the negative probe into the first cell next to the post and touch the electrolyte. A good strong cell with a decent charge will read 2.1 to 2.4 volts. Now, remove the negative probe from the first cell and stick it into the second cell, and take the positive prob and stick it into the first cell. This will give you the voltage reading of the second cell. Now repeat the process for all of the cells right on up the battery.
  7. A weak cell will read less than 2.0 volts. At this time I would add an additive to see if the sulfation in the cell can be cleaned up. It is best to do all the cells at once. If the additive is working the cell will gain strength with each successive charging. I even do this with forklift batteries that cost $7,000.00 to replace. You better believe my customers are happy with our company.
  8. Now having done all the cleaning and checking and testing, you can put the caps back on, put some anti corrosion paste on the positive battery post and terminals and replace the positive + battery cable first. Then repeat the process with the negative – ground cable. Most of the anti corrosion compounds work great on battery terminals posts and cables. Now this is not rocket science and on some of these expensive solar power packs it will save you thousands of dollars in the long run.
  9. Please view the video that appears with this article. It has veen viewed by over 250,000 people.

Walter H. Barrett is the President of Battery Chem International USA in over 55 countries.

Walt has offered to let me sell his Battery Chem additive here on the Tiny House Blog. Use it for your off grid home or your car and help keep this blog going at the same time. Only $19.95 . Use the Add to Cart button below to purchase.

Add to Cart

Posted November 16th, 2010 by Kent Griswold and filed in Announcement, Tiny House Articles
Tags: , , , ,
2 Comments

My Parent’s Micro Home

by Kent Griswold on November 11th, 2010. 38 Comments

Guest post by Walt Barrett (Be sure and watch the video at the end of the post)

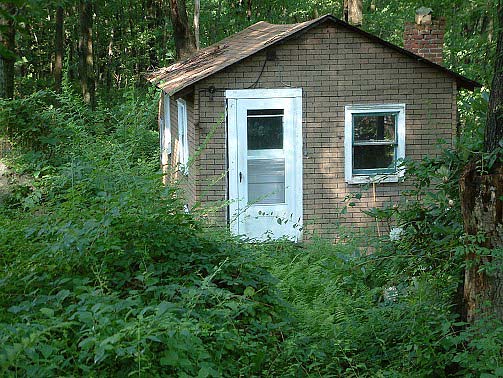
I have been writing about micro homes, solar, and energy efficient homes for 35 years. People never really paid much attention to any of it, and my Internet Blogs have gone virtually unnoticed for years. Recently, however, I have started receiving email from people who have read my articles about solar powered autonomous micro homes. Many of them are simply looking to down size, which I happen to think is a great idea, unless you have tons of money to save towards your future. The other people that have written to me have no place to call their own at all, and very little money either. All of these people are seeking as much information as possible about building micro homes, and also the support systems needed to make them a comfortable place to reside.

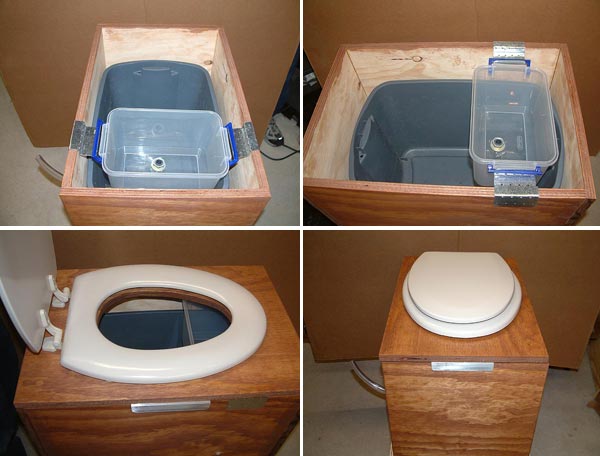
When you build a micro home the savings really add up quickly. First of all, if you are handy enough you may not need a mortgage. That alone is huge! A tiny well insulated home is less expensive to heat and cool, another major savings. Because of the LED lighting systems we have developed, solar lighting is relatively inexpensive. The electricity saved on lighting enables you to downsize the number of solar electric modules needed to power the home. Believe me, this is not rocket science as some people would like you to think. I like to keep things simple. Continue Reading »

Posted November 11th, 2010 by Kent Griswold and filed in Tiny House Articles, Tiny House Video
Tags: , , ,
38 Comments

Composting Toilet

by Kent Griswold on November 4th, 2010. 39 Comments

Following is a guest post by Walt Barrett.

I promised that I would write an article about the composting toilets that we build, so here it is. It includes my idea of a sliding adjustable urine separator.

The customers that we have using this toilet are very happy with it.

One of the main killers in the world is contaminated drinking water. In third world counties people can be very careless about where they dispose of their fecal matter. The sad results are disease followed by death usually from Cholera! This is because the runoff from this human waste is polluting the streams, rivers and lakes in those countries. We don’t need fancy units to solve this problem. All we need is to convince people to properly dispose of their own waste in a composter protected from the rain to prevent runoff. You would think that at least in the last 5000 years the could have learned that.

Well this is our version of the composting toilet for the off grid home so that you can have the indoor convenience and a safe, economical disposal method for human waste.

Please read this and don’t skip any steps or you will ruin the project.

It’s tricky in a couple of spots to get the unit in square.

This is a relatively simple unit to build and I am just going to take you through all the steps right now. My son John and I sketched out the design we had been discussing for a practical composting toilet, and figured out the dimensions that we needed to fit the actual standard toilet seat and make room below for the two plastic collection bins and the vent stack. We also wanted to build as many units as possible from a single sheet of decent quality 3/4 inch plywood. While at the Home depot we had a 4′ x 8′ sheet of plywood ripped into three long pieces approximately 16” wide each. Those cuts must be exact so all three lengths have the same width. Home Depot or Lowe’s will use a panel cutting saw which will make perfect cuts if the sheet is measured correctly. Note that due to the width of the saw blade the width will be slightly under 16”. You can compensate for this on assembly by assembling the pieces so that the box is slightly narrower than 16”

Next we cut two 16” wide X 16 inches high for the two (2) end pieces.

That leaves the two sides, the bottom, and the top. Now this is where you have to be careful. Look carefully at the construction of the box in the photos. We cut the two side pieces 22 inches x 16 inches high. That left the top and the bottom pieces which we cut 23 ½ ” inches long. Now we have all the pieces and that leaves us to position the store bought toilet seat and trace the hole in the top cover. I use the larger and better oval type toilet seat that fits the better quality toilets that you find in better homes and all commercial applications. They are much more comfortable for adults. I then drill a 3/8” hole for the saber saw, and cut out the hole in the top of the box. Make sure the hole is back far enough to accommodate the urine collector drain bin.

Now let’s stop right here for a minute and make a cutting schedule.

All pieces are ripped 16 inches wide. It allows you to get the most toilets from one sheet of ¾ inch plywood. So here is the schedule. ” = inches.

2 End Pieces 16” x 16”
2 Side pieces 22” x 16”
1 Bottom piece 23 ½” x 16”
1 Top piece 23 ½” x 16”

At this point it is best to sand, and clean all the pieces off with paint thinner. Because if you are going to stain your unit like we do here. You must stain before you start using the wood glue. If you don’t stain first, wherever you get glue on the wood the stain will not take and it looks terrible.

After the stain is thoroughly dry I use a couple of brads on each end and lightly tack the four sides together while just sitting on the bottom piece just to check for fit, and using a large metal square I make sure it will square up in three directions. You could also measure diagonally from corner to corner for equal dimensions in two directions. Then set the top on Just to make sure it fits squarely.

Once you are satisfied with all of the workmanship and the fit of all the pieces, it’s time for the permanent assembly. This is how we do it.

  1. Set the four sides that are lightly tacked together on your flat work bench surface.
  2. Remove one of the ends that you have tacked on and tap the finish nails that were holding it back away so that you can hammer them in again easily.
  3. Then run a thin bead of quality carpenters glue down just off center favoring the interior of the box. Do not use too much glue as it will squash out all over your finish. Thats why you always favor the inside edge. You cannot stain over excess glue blotches.
  4. Now careful pet the end cap back in place and nail it securely with six long finish nails on either side.
  5. Repeat the process on the opposite end.
  6. Next you run a bead of glue around the rim where the bottom of the box will be nailed.
  7. Set the bottom on and while someone helps to hold the box square you nail on the bottom using long finish nails about every four inches. It is very helpful if you nail a couple of cletes to hold the corners square while you nail your box together. Corner cletes on either end will also hold your box square while the glue is drying. If you have clamps, use them too get a tighter glue joint. You can also take a length of rope and wrap it around the box , make a loose knot, insert a length of stick and twist the rope until you get several pounds of pressure on your joints.
  8. Be sure to wash off any glue that squeezes out of the joints immediately.

That leaves us with the top which never gets fastened down because it has to lift on and off to remove both of the bins for cleaning etc. the lid is kept from sliding around by use four pieces of aluminum angle tacked inner the rim on the center of each side to provide a snug fit to the box. That way the lid is easily removed for cleaning purposes. See the photos for the aluminum pieces.

Now you have built a regular composting toilet without a urine separator. We got our plastic collection bins from Walmart. We purchased a smaller fairly deep bin for the urine collector. We got the fittings and clear plastic ½ inside diameter inch drain hose, and clamps from the plumbing department at the home depot. The drain hole goes out the side of the bin and box as high up as you can get it without kinking the hose and still get a good gravity feed to your exterior collection system. The brackets are made from the flat perforated metal plated to buy at the home depot that are use for building decks and joining pierces together for various construction projects. I bent then to the shape I wanted using my bench vise and a rubber mallet. Be careful for sharp metal edges! If you want a vent stack you can put it in one of the rear top corners or elbow out of one of the rear sides, or end. It the best way to go and add a solar vent fan too.

This is a pretty good project for a beginner, but believe me, manufactured units go from $800.00 to $2,500.00 dollars, and thats a lot of money for a person on a budget. This unit will work just as well. Just keep a spray bottle around with a little bleach and water in it to freshen up the urine catcher after each use. You can cover the fecal matter after each use with any kind of dries vegetable matter, like saw dust, Pete moss. Dried leaves, dried grass etc. Just don’t get bleach water in the composting material.

You can empty the compost into a barrel with a watertight lid on it. If you are going to introduce earthworms to the compost you have to keep it moist without drowning the worms. Be sure to make provisions fore the composter to drain excess fluids into more compost beneath it. Never compost anything near your water supply. Keep the composter as far away from you well as possible. After a couple of years the compost will turn int rich black soil. Throw all of your table scraps into the outdoor composter too.

Well, I think I covered everything. If I didn’t, I’m counting on you all to let me know.

Walt

© 2010 Walt Barrett

Posted November 4th, 2010 by Kent Griswold and filed in Tiny House Articles
Tags: , ,
39 Comments