This is part 4 of a series on building a small log cabin. This is a reprint from a 1983 Popular Mechanics article by Michael Chotiner with illustrations done by Harry Schaare.Enjoy and I hope this helps in your quest for the ultimate tiny log cabin.
As we move up the walls, alternate each successive log so that their smaller, tapered ends are not all on one end of the wall. Once the logs reach waist height, cut out the door opening.

Brace the logs on both sides. Of course, if your cabin is larger than the one shown here, you’ll have several interior partitions. These can either be made with logs notched into the outside walls or with framed walls later on. Notching the logs is preferred because it yields the same interior finish on all walls and strengthens the structure.
When the logs reach the top of your planned window and door openings, brace the walls and cut out all the open ings at once. Then cut a groove, as shown, in the log ends on both sides for a permanent stiffening spline. Cut and insert the spline and then add at least two more logs over the openings. The top wall log is called the plate log and it should be pegged at least every 4 ft.
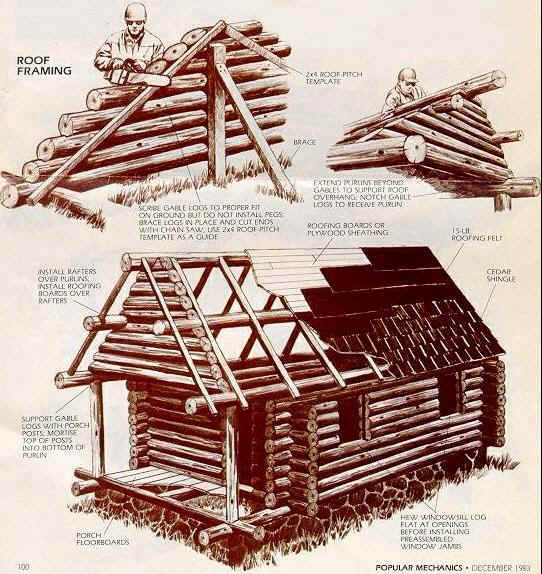
The roof on the cabin shown is a combination of purlin and rafter construction to give an idea of what’s involved with both. Normally, you would use only one. The purlins are set into notches cut in the gable ends; the rafters are notched into the plate log and ridge log.
Once purlins or rafters are installed, apply roofing boards for the roof sheathing. Next, apply 15-lb. roofing felt and either asphalt shingles or cedar shingles.
Finally, pre-assemble all window and door jambs, install them in the openings, and add the windows and doors. Allow 3/8-in. clearance for each vertical foot of opening above the jambs for the logs to settle. The spaces around the jambs should be chinked with okum (hemp and pine tar).
Wash the logs with detergent to remove any dirt, and then with a solution of two parts household bleach to one part water to lift out any stains. Rinse the logs t thoroughly with water and let them dry for a week. Then apply a mixture of one part linseed oil to five parts turpentine to the outside of the logs. This treatment should be repeated every five years.
This concludes this article on log cabin building.
If you enjoyed this post, subscribe to our feed
I liked it, looks very practical and buildable.
I’m totally going to do this!!! Thanks for the info.
That’s great, keep us posted on your progress, take pictures and tell us your story of your build.
Hello, very beautifull web site
Erik a french logbuilder
i like the web site thinking building it with a few changes